Flying drones isn’t just a hobby anymore—it’s a passion, a profession, and in many cases, a serious investment. Whether you’re capturing cinematic aerial footage, conducting inspections, or racing through obstacle courses, one thing is clear: drones are vulnerable to crashes.
Imagine soaring through the sky, capturing the perfect shot, and then suddenly, disaster strikes—signal loss, battery failure, or a strong gust of wind sends your drone plummeting to the ground. Heartbreaking, right?
That fear of mid-air crashes inspired us to create a smart, simple, and cost-effective solution:
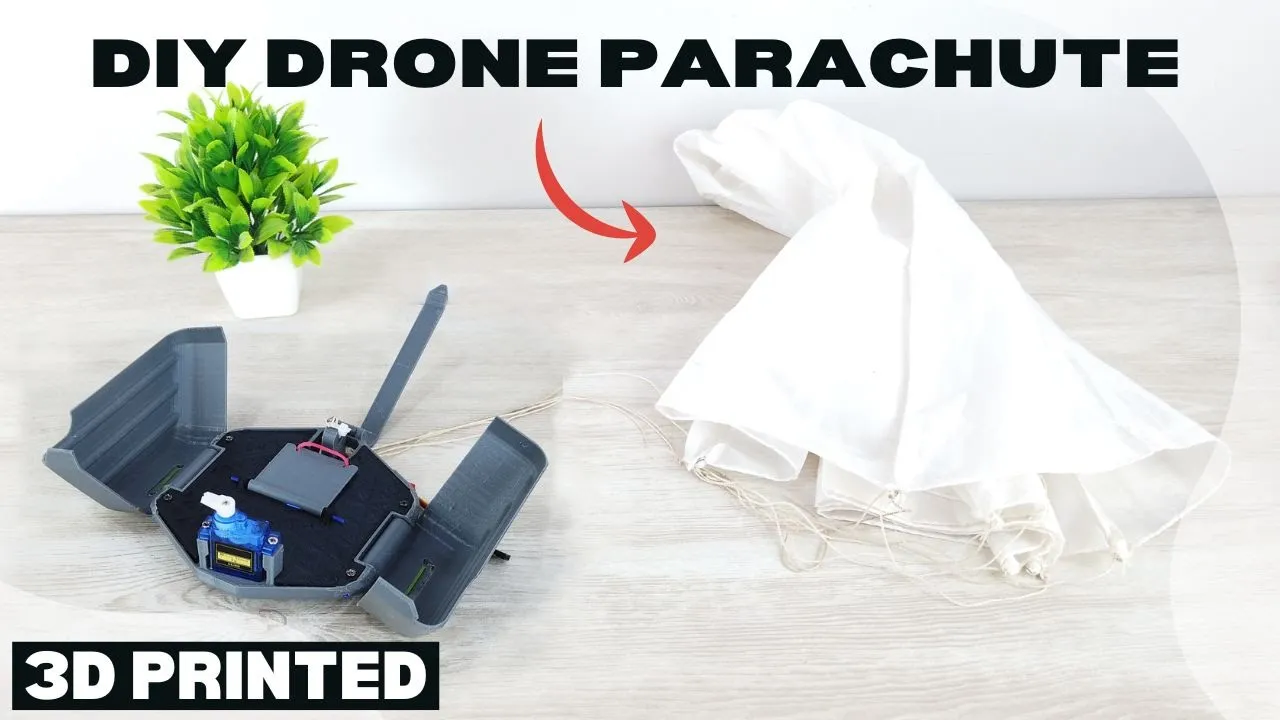
🌟 A DIY Deployable Parachute System – built using a 3D printer and basic electronics to protect your drone in emergencies.
In this guide, we’ll walk you through the entire process—from concept to construction—so you can build and deploy your own automated drone parachute.
📅 Why You Need a Drone Parachute
Before diving into the build, here’s why adding a parachute to your drone setup is a smart move:
- 🚁 Crash Protection: Dramatically reduces damage in the event of an uncontrolled descent.
- 💸 Cost-Saving: Saves you from expensive repairs or complete replacements.
- ⚖️ Lightweight & Modular: Easily adaptable to most drones or RC aircraft.
- 🚀 Beginner-Friendly: Simple to assemble and program.
- ♻️ Reusable: Can be reset and redeployed multiple times.
🛠️ 3D Printing Configuration
To create the housing and mechanism for the parachute, you’ll need a 3D printer. Use the following settings for optimal print quality:
- Layer Height: 0.2 mm
- Infill: 30%
- Material: PLA (Lightweight & Easy to Print)
🗄 STL Files: Download all print files at www.themechninja.com
🛠️ Components You’ll Need
Here is a complete list of components required to build this system:
| Component | Quantity | Function |
| SG90 Servo Motor | 1 | Releases the parachute |
| ADXL345 Accelerometer | 1 | Detects free fall motion |
| 450mAh 1S LiPo Battery | 1 | Powers the system |
| MT3608 Boost Converter | 1 | Boosts battery voltage for servo |
| NodeMCU or Raspberry Pi Pico | 1 | Runs the logic and controls release |
| Silicon Wires | As needed | Internal connections |
| PLA Filament (scrap) | – | Used as mechanical pins |
| Rubber Bands | 2-3 | Adds mechanical tension to lever system |
The best buy link us in the product description
📆 Step-by-Step Build Process
Step 1: 3D Print All Components
- Download and print each part using the recommended settings.
- Clean up support material and sand edges lightly.
- Arrange the components on a clean workspace.
Step 2: Wire the Electronics
- Connect the ADXL345 to the NodeMCU via I2C (SCL, SDA, VCC, GND).
- Connect the SG90 Servo Motor through the MT3608 boost converter to ensure sufficient voltage.
- Use the 450mAh battery as the power source.
- Keep wiring neat with silicone wires for flexibility.
Step 3: Mechanical Assembly
3.1 Install the Electronics Compartment
Secure all electronics inside the printed compartment. Use double-sided tape or hot glue to hold components in place.
3.2 Build the Lever System
Insert the lever using a small piece of PLA filament as the hinge. Attach rubber bands to provide tension for fast opening.
3.3 Close the Top Lid
Fit the top cover and align it with the lever system. Use another PLA pin for the pivot.
Step 4: Attach the Parachute
- Use lightweight ripstop nylon fabric.
- Fold loosely (not rolled) to ensure instant deployment.
- Secure it in the housing and use the integrated clips to mount it to your drone.
Step 5: Lock and Reset
- Press the locking button to secure the parachute.
- After deployment, refold the parachute and lock it again for reuse.
📖 How It Works
The ADXL345 accelerometer continuously monitors the drone’s motion. If it detects sudden free-fall or unusual acceleration, it sends a signal to the NodeMCU, which then activates the servo motor. The servo quickly releases the lever system, and the parachute deploys to reduce impact.
❓ Frequently Asked Questions (FAQs)
Q1. Can I use this parachute system on any drone?
A: Yes, the design is modular. It can be mounted on drones, RC planes, or gliders. Just ensure the drone can carry the added weight (approx. 60–80g).
Q2. Can I trigger the parachute manually?
A: Yes. You can connect the servo to your RC receiver or flight controller and assign a switch to deploy the parachute manually.
Q3. What is a “filament wire”?
A: It refers to short pieces of 3D printer filament (PLA or ABS) used as hinge pins in the mechanism.
Q4. What material and size should the parachute be?
A: Use lightweight nylon fabric. For drones under 600g, a 30cm to 50cm diameter parachute works well. Larger drones may need a bigger chute.
Q5. Will the parachute affect drone balance or flight?
A: Slightly. To minimize disruption, mount the system at the drone’s center of gravity. Test and trim your drone after installation.
Q6. Can I use GPS or barometric sensors instead of the accelerometer?
A: Yes. You can upgrade the system to use GPS or a barometer to detect altitude loss or speed changes for smarter deployment.
Q7. How much does the system weigh?
A: Between 60–80 grams depending on your materials. This might reduce flight time by 5–10%, which is acceptable for safety.
Q8. How do I test the parachute system?
A: Simulate a drop by shaking the drone downward from 6-8 feet. Watch the servo release and ensure the parachute deploys instantly.
Q9. Is this system reusable?
A: Absolutely. After each use, fold the parachute, reset the lever, and recharge the battery. Ready to go again!
Q10. Can I use this on FPV racing drones?
A: Yes, though FPV quads are more agile and typically crash in different ways. The parachute helps if flying over risky areas like lakes or buildings.
Q11. What if the parachute deploys mid-flight accidentally?
A: Avoid false triggers by calibrating the accelerometer properly. Use code logic to ignore small vibrations and ensure it only reacts to true falls.
🛫 Final Thoughts: Fly Smarter, Land Safer
This DIY parachute project is more than just fun—it’s functional, educational, and it can save your drone from disaster. With just a few basic tools and components, you can build a life-saving accessory that gives you peace of mind while flying.
Whether you’re an FPV racer, aerial photographer, STEM educator, or hobbyist, this project will improve your builds and deepen your understanding of electronics, programming, and safety systems.
🔗 Resources & Downloads
- 🗄 STL Files & Build Instructions: https://themechninja.com/product/drone-parachute/
- 🎥 Full Video Guide https://youtu.be/XJOXW2xPD5I
- 📚 Code Samples & Schematics: https://themechninja.com/product/drone-parachute/
Have questions, or want to share your own build? Tag us with #MechNinjaParachute and join our community of drone innovators.
Would you like this as a PDF or want SEO meta titles and meta descriptions for posting this on your blog? Let me know!ould you like this as a PDF or want SEO meta titles and meta descriptions for posting this on your blog? Let me know!