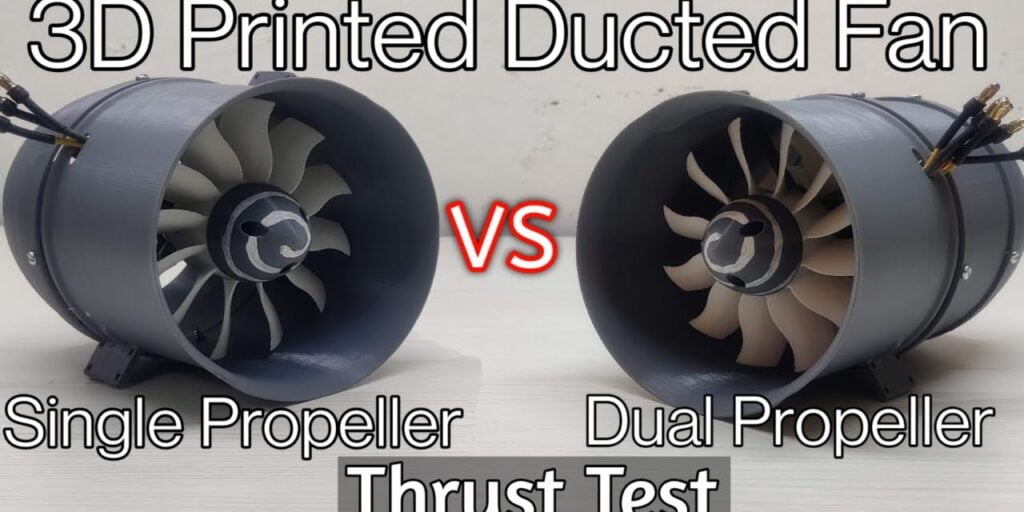
This article is a step-by-step guide for a DIY 80mm Electric Ducted Fan, a YouTube video on the same is also uploaded on our YouTube channel. This time we will design an 80 mm ducted fan and check its thrust with different propellers. The thrust performed will be for 3-inch 12-blade, 6-blade, and 8-blade propellers.
The STL files designed by us for 80mm EDF are given below you can buy and download them from there. Our Indian customers can order 3D printed 80mm EDF, which will be directly delivered to their location for ordering 3D Printed select order type 3D printed (In case of any query feel free to contact us).

80mm EDF V1.0
6, 8, & 12 Blade Propellers included. All parts(.STL files) in one .ZIP file. Easily printable on 220X220X250(mm) 3D printer. Total printing Volume: 88,290 cubic mm. License – TheMechNinja Paid Standard Digital File License
CAD Model and 3D Printing It
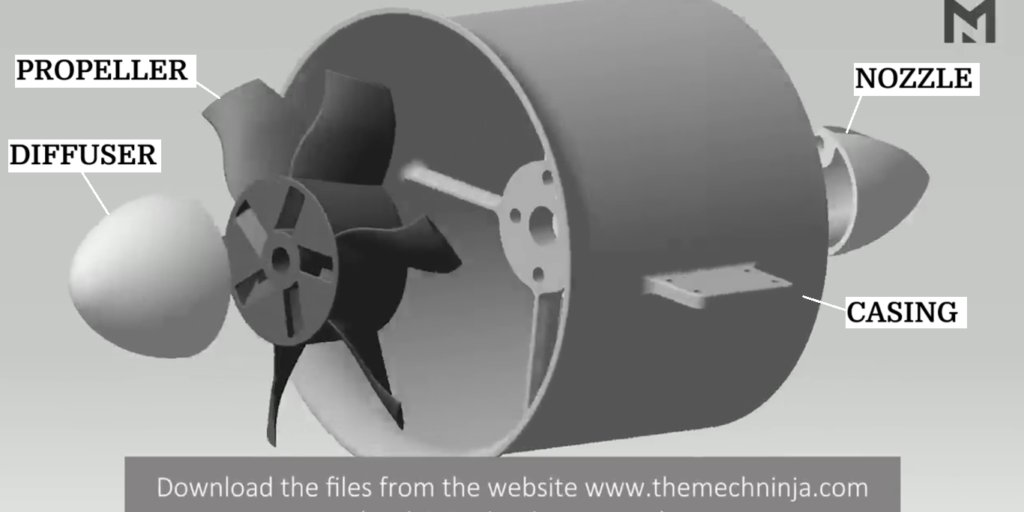
This is the CAD model of the ducted fan with all its necessary parts. You can download the files from the website, themechninja.com. All these parts are printable on any 3D printer.
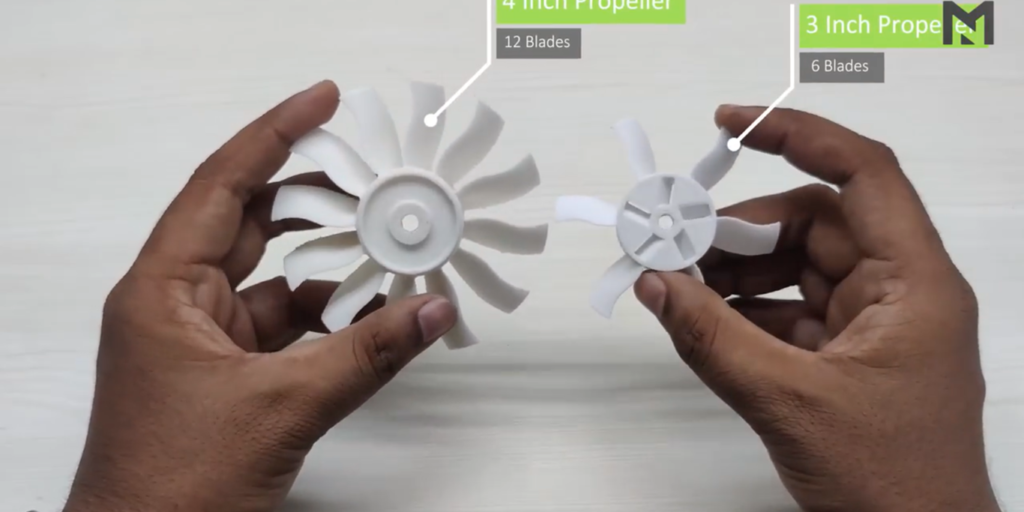
The propeller shown here has six blades, but I’ve also made two other propellers with 8 and 12 blades for testing.
The 80mm EDF V1.0 file you have downloaded above has the following 7 parts.
- 6 Blade Propeller
- 8 Blade Propeller
- 12 Blade Propeller
- 80mm Shell Holder
- Diffuser
- 80mm Shell
- Nozzle
I’ve already 3D printed all the parts with a 0.2 mm layer height and 30% infill.
So let’s begin with the assembly of the ducted fan.
Removing Supports From The 3D Printed Parts
All the 3D prints have some supports which are necessary to support the overhanging areas of the print. These need to be removed after the 3D printing is finished.
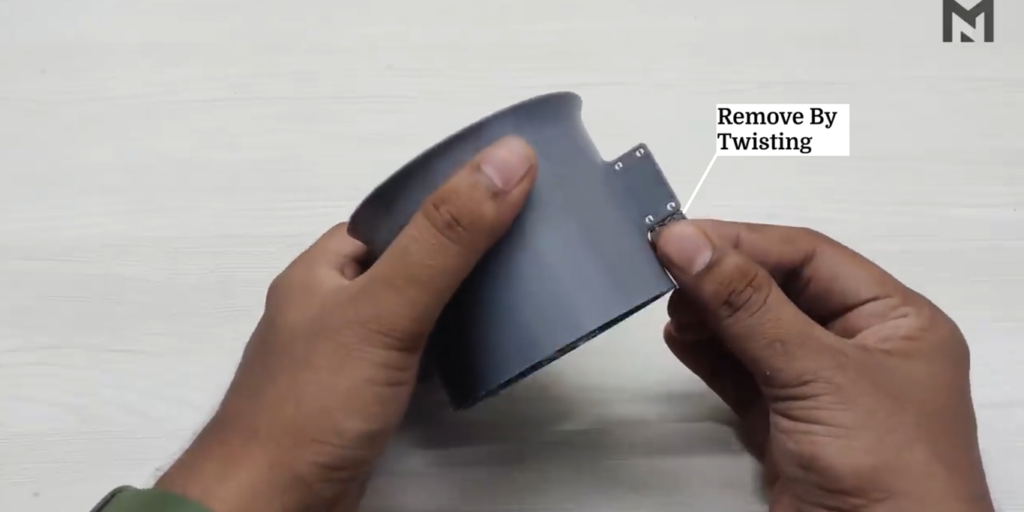
Removing Support from the 80mm EDF: Casing
- Start with the easiest support, which can be removed by twisting. (See Image Below)
- Now for the complex support, use a set of nose pliers and a wire cutter.
- Grab the support with a nose plier and twist it from all sides.
- Don’t try to pull it, or else it may damage the part.
- Keep twisting it from all sides until it becomes loose and it will easily come out.

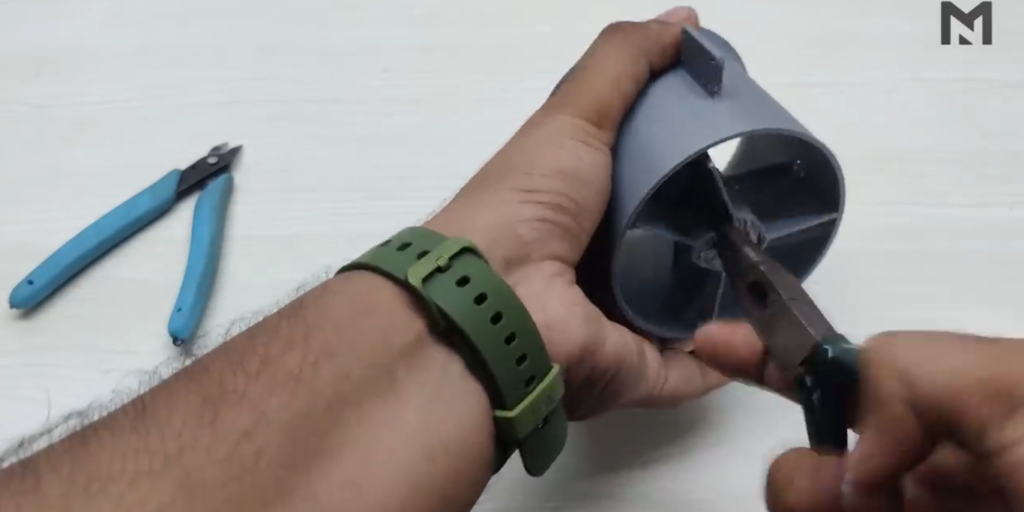
- Use a wire cutter to cut the extra support.
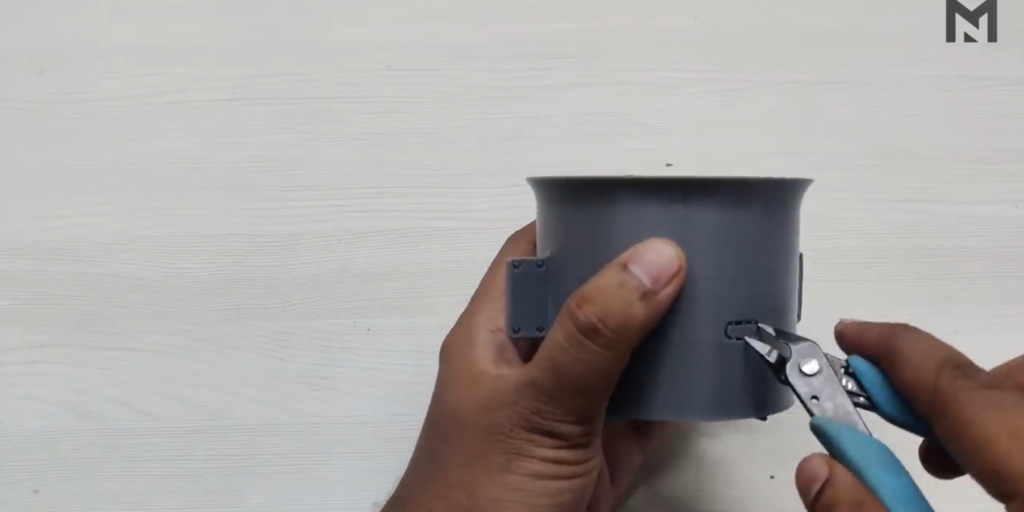
- Once all the support material is out, you’ll find some of these support materials sticking to flat surfaces.
- So, use a wire cutter and remove all of them.
- After removing all the support material, the casing will be ready.
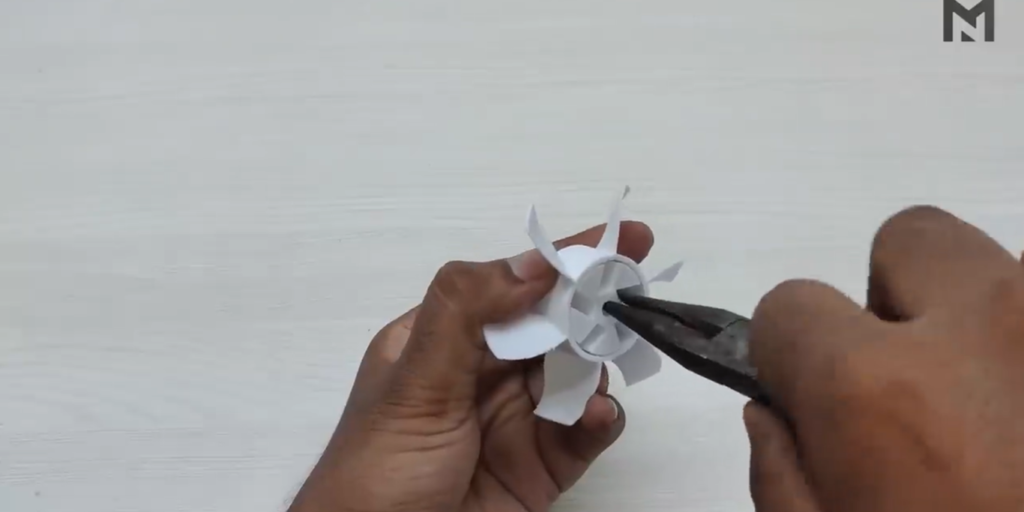
Removing Support from the 80mm EDF: Propeller
Now we will remove support from the propeller, we have printed for 80mm EDF.
- This is a 3-inch propeller with six blades. It is designed for any motor which has a shaft diameter of 5 mm.
- Now grab a wire cutter and carefully look for the line of joining of the support.
- Look carefully as both the blade and the supports are of the same thickness.
- Then place the wire cutter on the support and cut it carefully, making sure not to cut the blade, and then remove all the support material from the six blades.
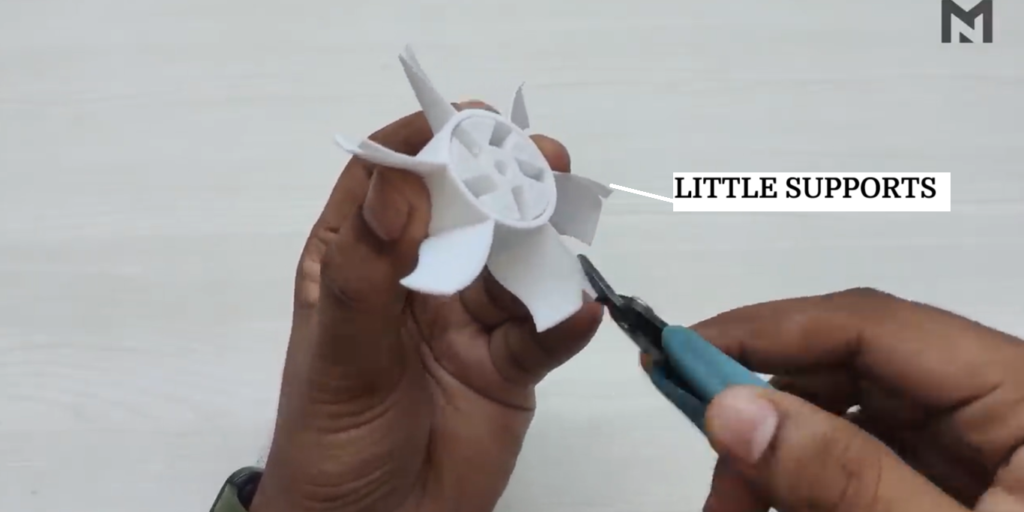
- Now to remove the hub support, place the nose plier inside the support and twist it.
- After twisting it two to three times, it will come out. and now the propeller is ready.
On comparing it with the four-inch propeller, it has a reduction of 12 mm on all sides.
This 4-inch propeller has thicker blades than the 3-inch propeller.
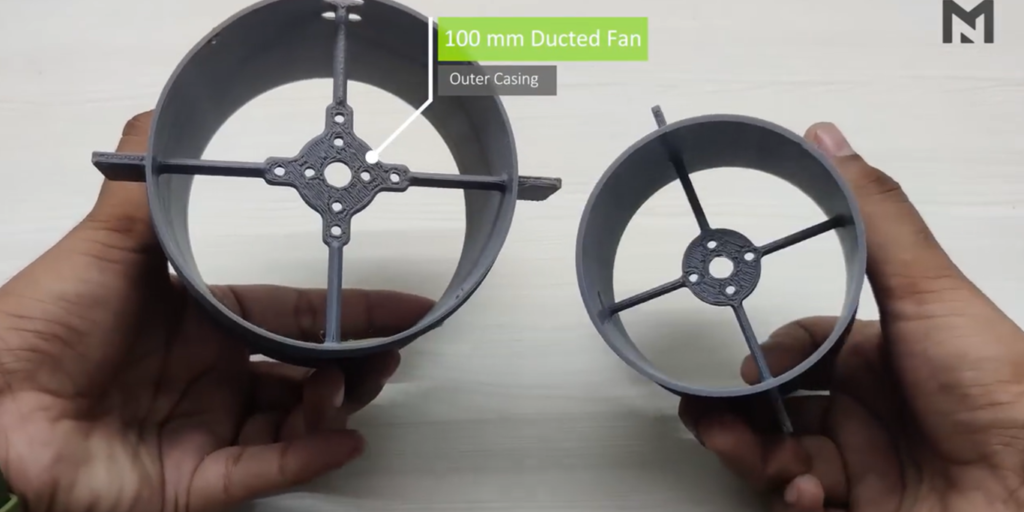
Short Comparison: 80mm VS 100mm
When compared to the 100 mm ducted fan, this one appears to be much smaller. Both the casings are of similar shape, only there is a size reduction.
The 100 mm casing has an O-ring present at the lower end of the body, to provide extra strength. while it’s been eliminated from the 80 mm fan as it’s already smaller.
If you haven’t watched my 100 mm ducted fan video, then click on the I-Frame given below and have a look.
Now talking about the three-inch propeller, these five grooves that I’ve designed play an important part in the functioning of the EDF.
In the previous version, when the motor was attached to the propeller, the motor was wrapped around it and there was no way for air to get inside the motor vents. and thus, the motor gets heated after long usage.
So these grooves allow the flow of air to the motor and keep it comparatively cooler. We’ll check the temperature difference with and without the diffuser at the end, and compare the results.
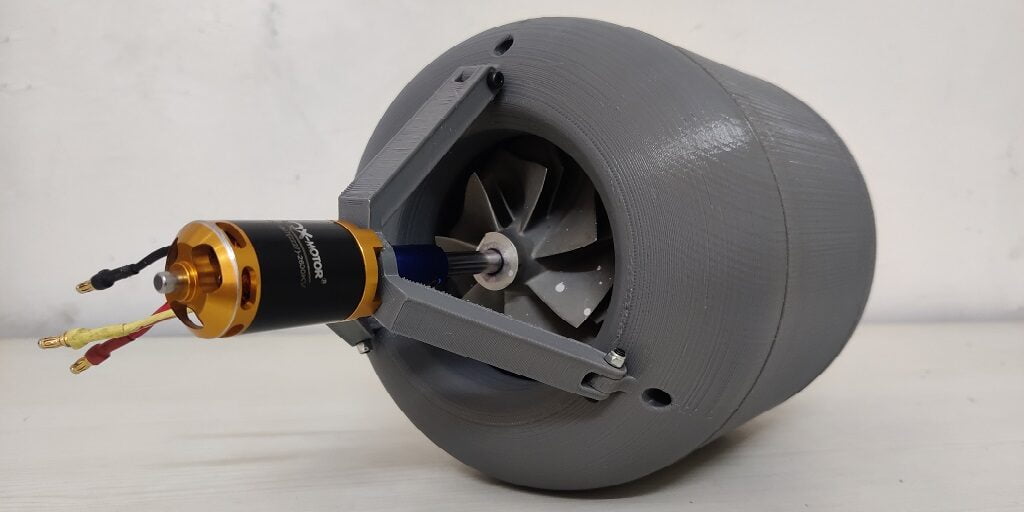
Full Assembly of 80mm Ducted Fan
We will be using a 2500 KV Racer Star motor in this fan. To check the thrust test of the motor click the following link Racer Star 2500 KV thrust test. When we attach the motor to this propeller, we can see the air vents of the motor. These grooves will push the air inside the motor and cool it.

Now we will begin the assembly of the ducted fan.
- The diffuser has a slot for the M5 nut of the motor.
- Now take the motor and open its nut.
- Then take the propeller and attach it to the motor shaft.
- Try to attach it in such a way that the motor vents are visible from the grooves, as it will help with faster cooling of the motor. and once we get the position, tighten the motor nut with a wrench.
Once the assembly is finished, spin the propeller to check if it is offset or not. Then take the diffuser cap place it on the motor nut and press it from all sides. and make sure that the diffuser is perpendicular to the motor.
80mm EDF Attached to Holder
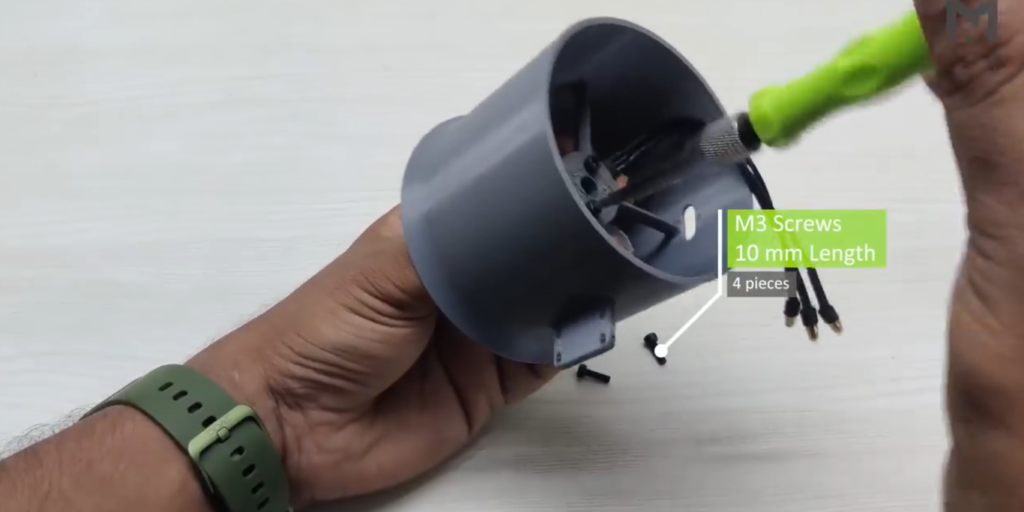
- Now it’s time to attach the motor to the outer casing.
- So first match the screw holes and then fix two screws in the holes which are closer to the motor shaft.
- I’m using M3 screws 10 mm in length.
- I have not attached the other two screws yet, as they will be attached to the nozzle.
- So grab the nozzle, insert the two screws, and then fix it with the motor assembly.
The last part is to take out the motor wires from the outer casing. The assembly of the EDF is completed, and it’s time for the thrust test of it.
80mm EDF: Attachment For Mounting
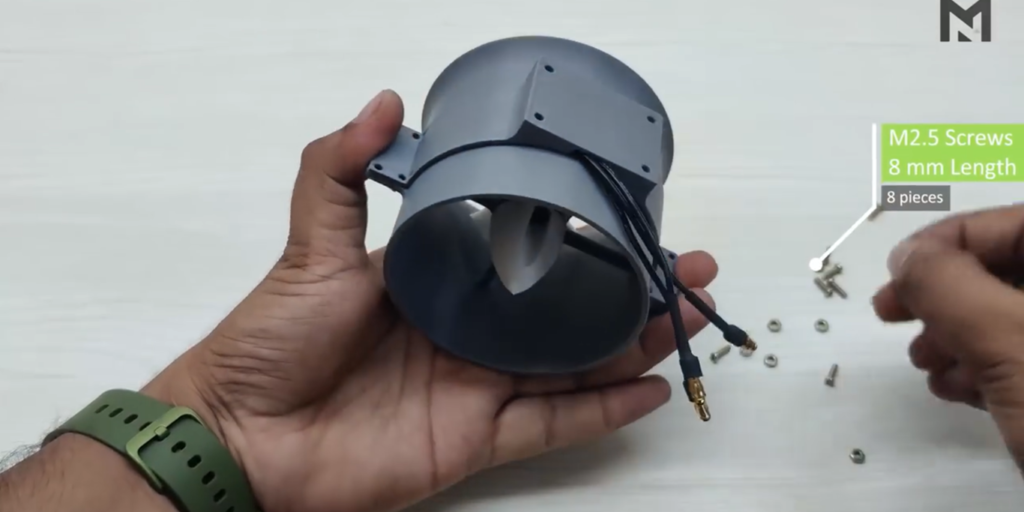
- Before attaching the EDF to the test rig, I will mount this attachment to the EDF.
- So, first, take four M3-diameter nuts and insert them into the attachment’s grooves.
- These nuts will help in attaching the EDF to the test rig.
- Now wind the motor wires together and place the EDF above the attachment.
- I’m using eight screws of M2.5 diameter and 8 mm length to mount the EDF with the attachment.
- After connecting it, the EDF will have a flat bottom and it can be mounted on the test rig.
Thrust Test of 80mm EDF
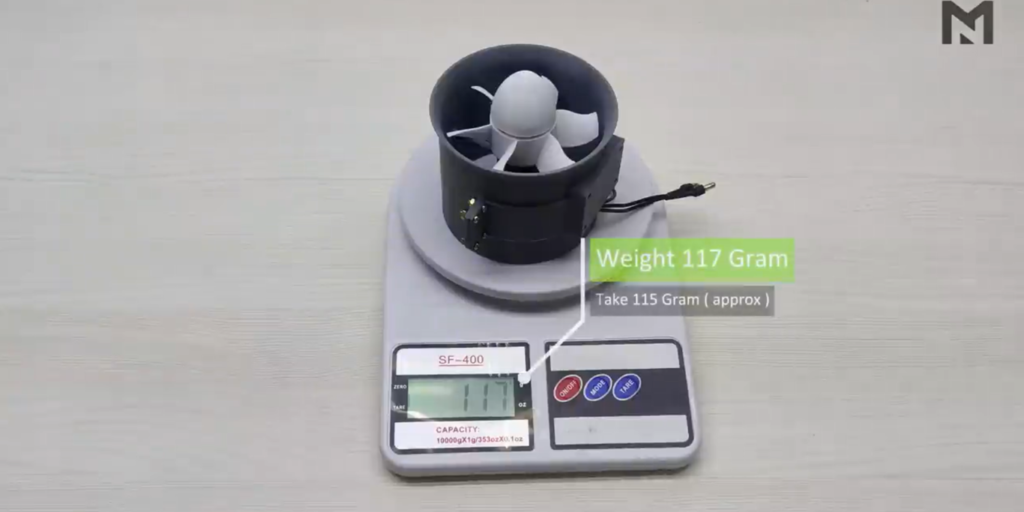
First I will calculate its weight. and its weight is around 115 grams. So this is the test rig (To watch the video click the following link Thrust Test Rig) that I made.
Now I will check the force needed to lift this arm in the mid position. and that’s around 115 grams.
So the total ideal weight becomes 230 grams.
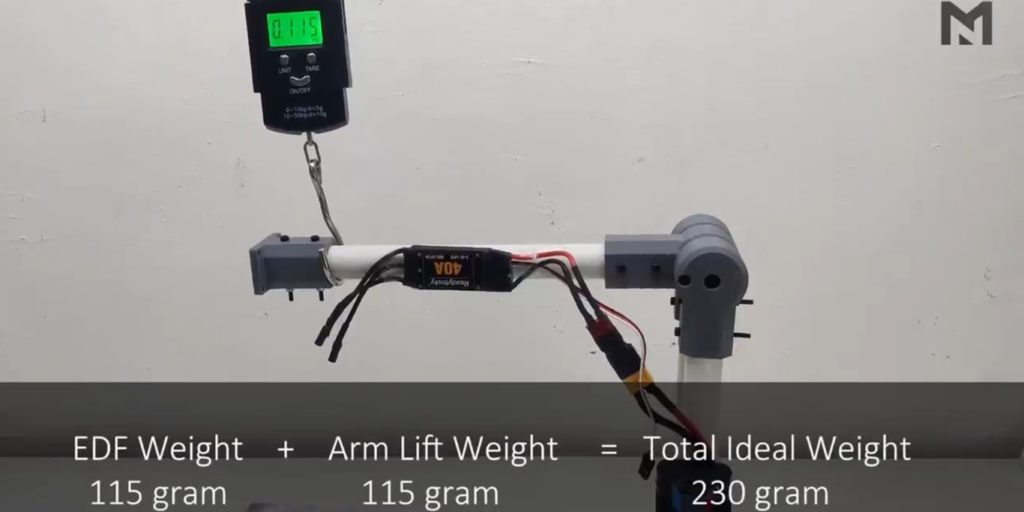
| EDF Weight | Arm Lift Weight | Total Ideal Weight |
| 115 Gm | 115 Gm | 230 Gm |
Now attach the EDF to the test rig and connect them with four screws of M3 diameter and 10mm length. Now the EDF is ready for testing.
Thrust Test Rig Parts
- The string I’ve used in the thrust test rig transfers the force from the EDF to the spring balance.
- I’m using a 40 Ampere ESC and a Wattmeter to calculate the current.
- Servo tester to control the EDF, The wrench that I have placed here is used to fix the spring balance.
- Spring balance, which can weigh up to 50 kg.
So, before starting this test, make sure to wear protective glass.
I am connecting an 11.1 Volt lithium-ion battery of 3000 maH Switching on the spring balance and starting the throttle.

80mm EDF Thrust Test
The maximum thrust we got was 265 grams at 25.33 amperes. Adding the ideal weight to lift the arm, i.e., 230 grams, we get the total thrust of 495 grams at 25.33 amperes.
Now I will replace this propeller with the 8-blade propeller.
80mm EDF Thrust Test With 8-Blade Propeller
- First, remove the diffuser part by pulling it out, and then hold the motor from the bottom and loosen the motor nut with the help of a wrench.
- Once the nut is out, pull out the propeller.
- Now I am using the 3-inch propeller with eight blades. So, attach it to the motor and fix it with a nut. Once the nut is tight, put the diffuser back on top of the motor.
Now we will begin the thrust test of this 8-bladed propeller. So, switch on the spring balance and connect the battery.
The maximum thrust we got was 250 grams at 25.67 amperes. and adding the ideal weight, we get a total thrust of 480 grams at 25.67 amperes.
80mm EDF Thrust Test With 12-Blade Propeller
Now I’m going to replace this propeller with a 12-bladed one. This is a 3-inch propeller with 12 blades.
Remove all the supporting materials from it, and attach it to the motor.
Begin the trust test on it.
We get the maximum thrust of 245 grams at 26.35 amperes, and on adding the ideal weight, we get a total thrust of 475 grams at 26.35 amperes.
Temperature Test With & Without Diffuser
Now the trust test has been completed, it’s time to check the cooling rate of the motor.
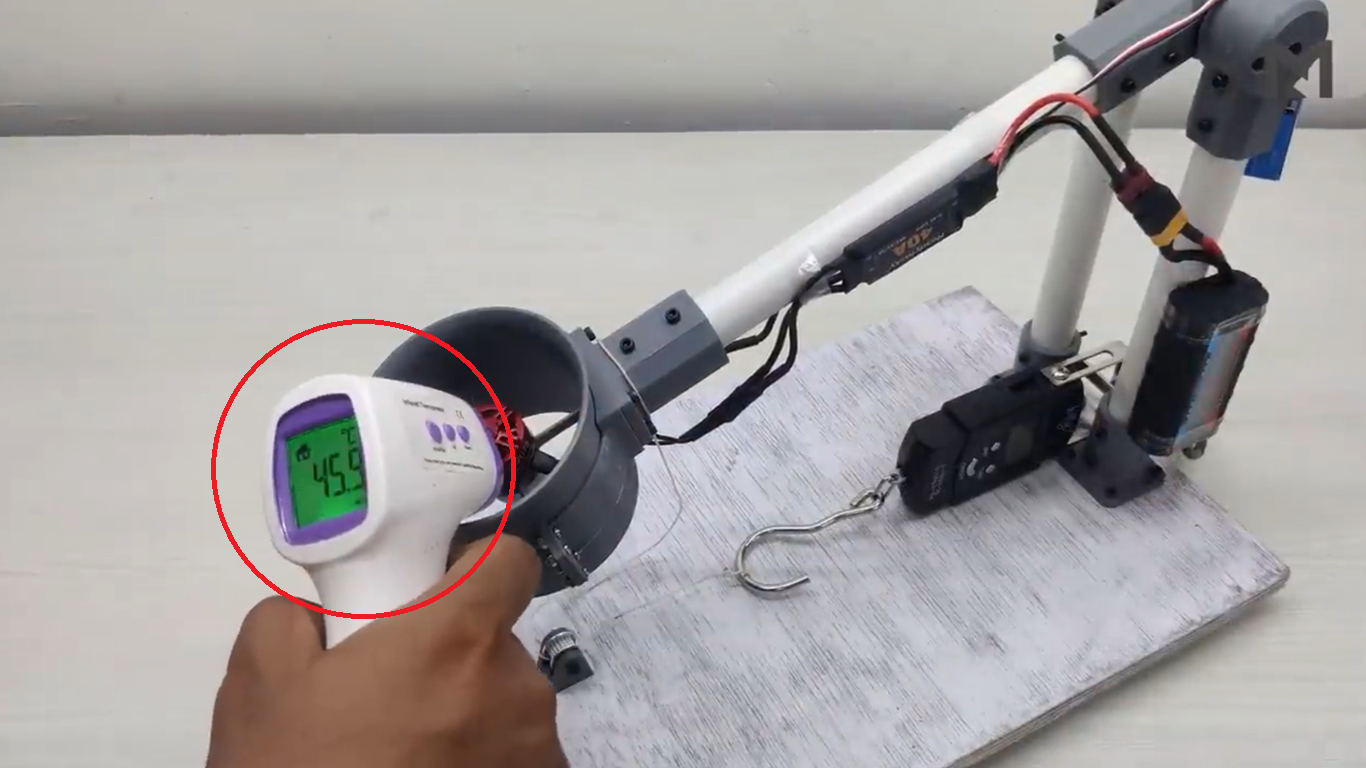
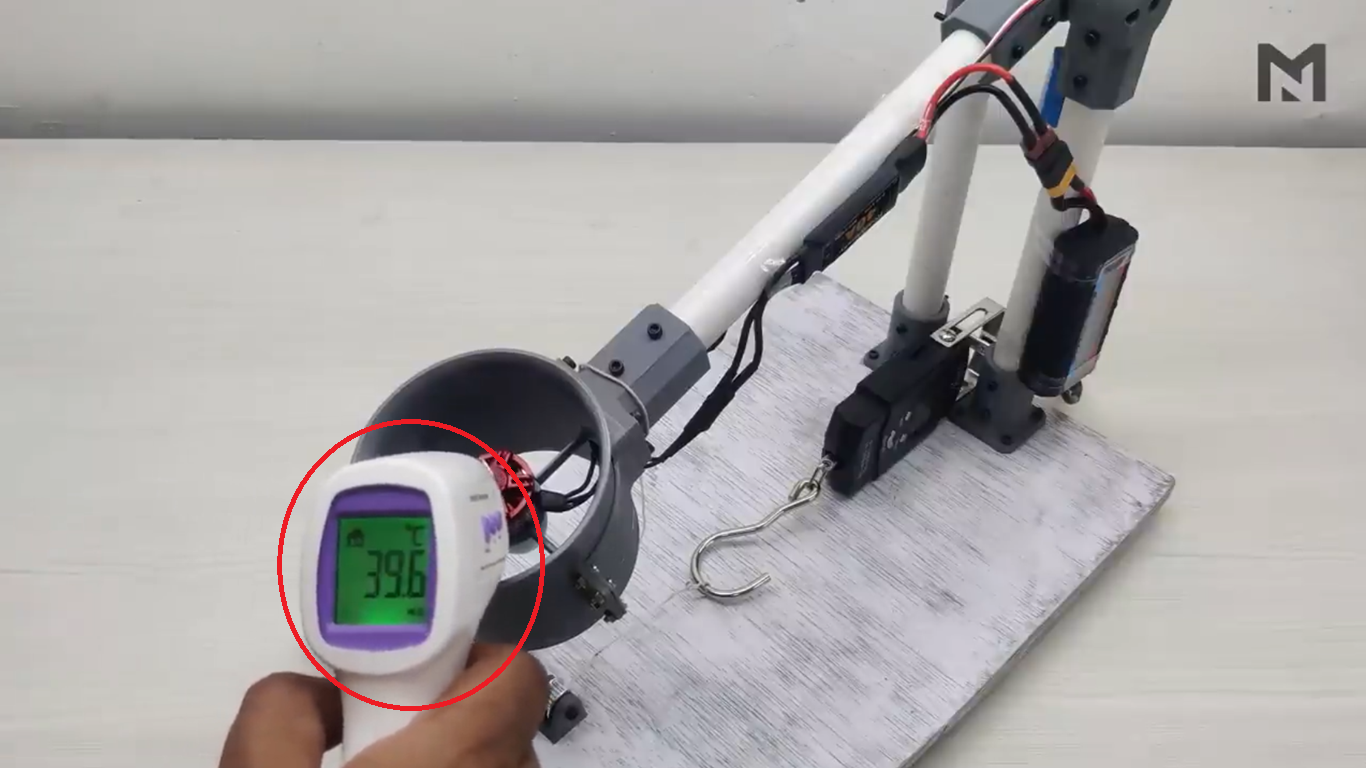
- So I will check the temperature difference between the motor with and without the diffuser part.
- The current temperature of the motor is 45.9 degrees Celsius, and now I will run the motor without the diffuser part.
- So, I have run the motor for about 10 seconds, and now I will check its temperature.
- The temperature came around to be 39.6 degrees Celsius, which is about 6.9 degrees Celsius less than the previous one.
- Hence, the cooling grooves of the propeller are working perfectly.
The 6-blade propeller gives the best efficiency in an 80mm EDF, we found this after performing thrust tests with 6,8 12 blade propellers.
An 80mm EDF without any electrical component weighs around 115 gm.
The temperature ofcore of motor varies from approx 45.9 a degree Celsius without grooves to approx 39.6 with grooves.
Observations
| Propeller | Max Thrust (g) | Current | Power (w) | Efficiency (g/w) |
| 6-Blade | 495 gm | 25.33 A | 286.3 W | 1.73 |
| 8-Blade | 480 gm | 25.67 A | 286.1 W | 1.68 |
| 12-Blade | 475 gm | 26.35 A | 284.3 W | 1.67 |
The thrust test of EDF has been completed, and it’s time for the observations. The 6-blade propeller produces the maximum thrust of 495 grams at an efficiency of 1.73 while the 12-blade propeller produces the least thrust of 475 grams at an efficiency of 1.67.
On observing, you’ll see that by increasing the number of blades, the thrust of the motor is decreasing and the current consumption is increasing.
This means that, on increasing the number of blades, the torque requirement of the EDF increases, and the current consumption of the motor increases, which leads to lower efficiency. We can conclude that the 6-blade propeller produces maximum thrust at an efficiency of 1.73, which is neither too low nor too high for a homemade EDF.
Keep in mind that the motor that I’ve used has very high rpm but low torque, and EDF requires a high-torque motor.