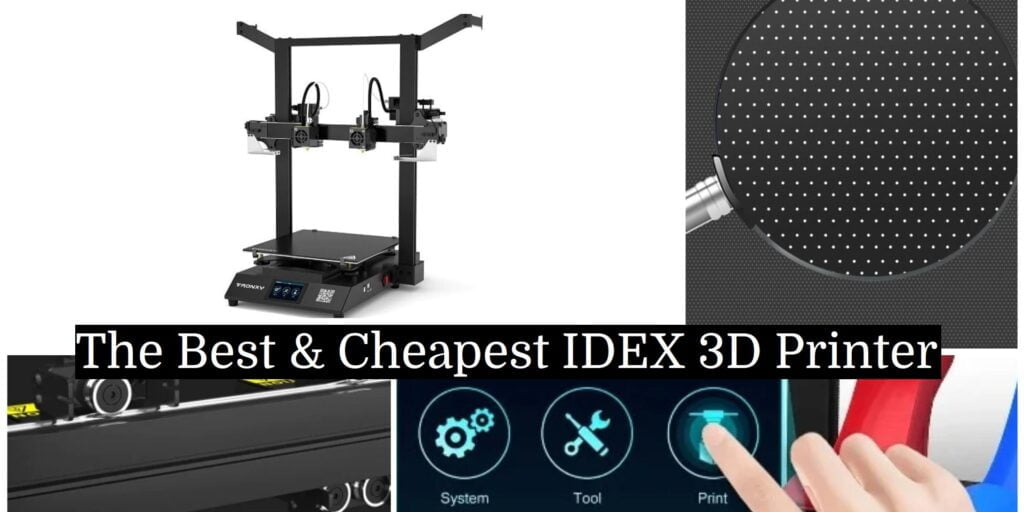
IDEX stands for Independent Dual Extruder system. In traditional printers, you can see they have one print head which comes in a single nozzle or dual nozzle system, by using a dual nozzle print head you can print with two materials. So the main difference in the IDEX printer is that it has two moving heads with individual nozzles which are able to move in any direction on X- the axis while printing. this independence allowed users to print similar copies of the object on half of the print bed while printing.
Now, coming to the main topic of the post i.e. Which is the best & cheapest IDEX 3D printer? Presently cheapest IDEX printer is TRONxy Gemini XS IDEX. It comes in a cartesian configuration. It has a print area of 255mm * 255mm * 256mm, at the price point of $474.05 on “tronxy3d.com”.

NOTE:- FOR using an index printer it is important that your slicer software is correctly configured for IDEX.
Get It On Amazon.com
TRONXY IDEX 3D Printer Gemini S, 4 Print Modes 8 Languages Silent Board Support PVA, Print Size 300x300x390mm
In The Post-
- General Specification
- In The Box of Gemini XS IDEX
- TRONxy Gemini XS Structure
- TRONxy Gemini XS Electronics
- TRONxy Gemini XS User Interface
- TRONxy Gemini XS Bed Levelling
- Test Prints for Cheapest IDEX 3D Printer
- TRONxy Gemini XS Ease of USE
- Conclusion
Cheapest IDEX 3D Printer
General Specification
- Dual Material Printing
- Duplicate and Mirror Mode
- Powered by STM32F446Z
- TMC2225 Stepper Drivers
- Eight Language support
- Sd card support
- USB support
- Z and Y-axis have V slot wheel
- The X-axis has u shaped bearing over a smooth rod combination of Aluminium extrusion.
- Colour Touch Screen
- Different Theme
After reviewing these specifications it is time to take a deep look at the cheapest IDEX 3D printer.
Cheapest IDEX 3D Printer
In The Box of Gemini XS IDEX
The cheapest IDEX 3D printer i.e. Gemini XS comes in two parts. The upper unit consists of the x-axis and z-axis and the bottom unit with y-axis and electronics inside. In the box, there are the following things.
- Screws and tools to assemble the printer
- Two different color filaments
- Two Nozzle Cleaning Brush
- Lattice Glass for heatbed
- Wrench and Allen keys
- Noise kipper
- USB cable
- Memory card
- Extra nozzle
- Glass-heatbed screw connecter.

Cheapest IDEX 3D Printer
TRONxy Gemini XS Structure
The overall build of the printer is a mix of sheet metal and aluminum extrusion. It has Aluminium 2040 but these are a little different. These aluminum extrusions have a clean smooth surface there is no movement of the v-slot wheel.
All the electronics are at the bottom. The bottom of the printer is made of sheet metal and aluminum extrusion with a touch display in front of the printer. The length of print from left to right is 520mm and from front to back is 415.5mm and the height of 560mm with a filament spool holder.

Cheapest IDEX 3D Printer
TRONxy Gemini XS Electronics
Gemini XS has an STM32F446Z controller. Yes, it is a 32-bit microcontroller. All the electronics are at the bottom. It has ribbon cable wiring to make assembly simple and magnetic limit switches. It uses 24V with TMC2225 drivers so the steppers are quiet. For controlling the printer we got a color touch display with a simple and clean user interface.
Assembly and Power Up:-
For assembling the printer in a single piece you need to add an upper unit with a base with help of four screws on each side. Now recheck that every screw is tightened after that add a Lattice glass plate on the heat bed (Note:- Remember to Remove the protecting film).
After adding the glass plate to the heatbed and tightening its connecter screw we move to attach the nozzle cleaning brush on both sides of the x-axis with the screw. On the top of the printer, you must attach a filament spool holder on both sides.
Now, the only part left is connecting the electronic. For this you need to connect the z-axis stepper connecter to the motor and Z – the axis limit sensor to the z-axis therefore connect the ribbon cable to the connector.
After all of this check, the power level switch according to your mains voltage, plug in the power cable and turn on the printer.
Extruder and Hotend:-
It consists of Titan Extruder and MK8 Hotend for both heads. Both heads are Bowden-type extruders. As we know titan extruder is lightweight and has higher pusher force because of the 3:1 gear ratio.MK8 hotend gives you a higher flow rate, so the mix of titan extruder and Mk8 hotend is good.
BuildPlate:-
Gemini XS comes with a Lattice Glass build plate, so you get a flat surface for your printing. Yes, you need to level the build plate for the nozzle, but because of the glass build plate leveling is not hard until the glass has a manufacturing defect.

Cheapest IDEX 3D Printer
TRONxy Gemini XS User Interface
Controlling the printer is smooth because of the clean menu. After powering up the printer we see three options.
- System
- Tool
- Print.
In System Menu we got the following options:-
- Status option From which you can get the current position temperature.
- In the INFO menu, you can see the machine name and its controller name, and machine ID.
- From language, you can change the language.
- By default, the option machine reset to its default setting.
- In the Theme option, we can change its display theme.
- In the Mode option, we interact with the main functions of the IDEX printer which are duplication or mirror printing.
Also, there is more option like full-control means that you can control your printer and all parameter via another computer. In the Mode menu, we can also set extruder offset.

In Tool Menu We got the following option:-
- Manual – Controlling all the stepper motor positions.
- Preheat – From this, we can preheat heaters by just clicking that particular heater that we want to heat up also by using the side arrow we can change the temperature.
- Filament – when we want to load, unload and purge filament we can use this option because from here we can turn the heater on and off and control each extruder motor.
- Level – This is for leveling. Gemini XS has no auto-leveling sensor so you need to do leveling manually. This option helps us while we do manual leveling by moving heat to a different point.
- Fan – Here you can change both print head fan speeds. For selecting a particular head, on the right side, you can see the E1 option, when you click on this it changes to E2 from here you can control the E2 head fan. There is also a board fan option but I think it is good that it keeps turning on if you live in warm weather if your weather is cold you can turn off this fan and take advantage of quiet printing.
- Stop – As the name suggests to stop the movement of the printer we use this option.
In Printing option:-
Here you will find an SD card and USB drive from which you can initiate printing.
TRONxy Gemini XS Bed Levelling
To initiate the bed leveling process you need to go to the tools menu from there you can see the level option. When you click on the option printer asks you for manual or cancel because Gemini XS does not have auto bed leveling so you need to adjust heatbed height for a good distance between the nozzle and the glass bed. Below the bed, you see large nuts by rotating them you can decrease or increase bed height.
After clicking on the manual new display opens with 5 circles these circles show the place on the heatbed. On touching the particular circle nozzle goes to that side of the heatbed. Then place A4 paper between the nozzle and heatbed and adjust the heatbed height until you feel any resistance in pulling the paper or you shall use a filler gauge of 0.1mm for the same process. Using a filler gauge is a more scientific method to do.
Do the same thing for all five points. After the Bed is level for the E1 head nozzle we move to the E2 head nozzle. For the E2 head nozzle we don’t need to do the same process but only adjust the E2 head nozzle to the same height as the E1 head nozzle. For doing this follow the following steps:-
- First, untighten the two front screws with a little bit of E2 head on the front side.
- Now use the upper nut of the E2 head to adjust the E2 head height.
- Use A4 paper or filler Gauge between the nozzle and hotbed to Achieve the correct height.
- After that retighten the two screws. And the leveling is complete.
Cheapest IDEX 3D Printer
TRONxy Gemini XS – Setting Extruder offset
For extruder offset, we don’t need to do anything if it comes pre-calibrated from the factory but if don’t we need to correct the extruder offset for successful printing. For IDEX you need to correct the nozzle offset of the E2 head for the E1 head which means you tell the printer firmware how the E2 head nozzle offsets from the E1 head nozzle position. You need to do this for the X and Y axis because the z-axis is done in the leveling process.
For x-axis offset
- Select the E offset option from the Tool menu.
- Select X-axis.
- Click on the test. Wait till printing is finished.
- Now measure the offset of the E2 head print from the E1 head print then add or subtract the offset value.
- Now click again on the test. After Printing check for any offset, if everything is ok then Go for Y axis offset, if anything was wrong then check whether you need to do the opposite of the previous option (Like if you add during the last time now subtract the value Now).
For y-axis offset
- Everything was the same for the all steps except we just needed to select the y-axis and follow the same steps which we do for the x-axis.
- After setting the correct value for the offset you can save the value and It’s done. Ready to print.
Test Prints for Cheapest IDEX 3D Printer
Cheapest IDEX 3D Printer
TRONxy Gemini XS Ease of USE
From the view of a beginner, it is quite easy to assemble the printer. The instruction manual is good. it builds in a belt tensor that really helps you whenever you change your belt. Also on the sd card, you get the necessary software and drivers. For you just need to load the filament and choose a mode of printing then print from the onboard memory device(Like- an SD card, or USB cable) or via a USB cable. Glass heatbed gives you a flat surface so leveling is easy if you know all its prospectives.

Pros and Cons:-
- MK8 hotend allows you to increase print speed. BUT both hotend have PTFE linear so you can not go beyond 260oC, beyond 260oC the PTFE linear starts disintegration.
- It has two stepper motors for z-axes, which is good but they can add two different types of hotend E1 and E2 heads for a more wide range of different material uses.
Cheapest IDEX 3D Printer
Cheapest IDEX 3D Printer | Questions
Which is the cheapest IDEX 3D Printer?
Presently the best and cheapest IDEX printer in 2022 is TRONxy Gemini XS IDEX.
What is the printing volume of the cheapest IDEX 3D printer?
The cheapest IDEX printer in 2022 is TRONxy Gemini XS IDEX, it has a print area of 255mm * 255mm * 256mm, at the price point of $474.05 on “tronxy3d.com”.
What is an IDEX 3D Printer?
IDEX stands for Independent Dual Extruder system, it has two moving heads with individual nozzles which are able to move in any direction on X- the axis while 3d printing.
Conclusion
This long blog helps you to know most of the things about the Gemini XS IDEX 3D Printer. From begging to the conclusion you get to know multiple things about Gemini Xs IDEX, its specification, Assembly Process, Wiring process, Leveling process, menu, and required calibrations.
Gemini XS is one of the cheapest currently available markets. Still, there are many IDEX printers that are more expensive than Gemini XS but good if you also take a look at them and then make a decision on which is best suitable for your work. Hey, one more thing is about the upcoming sneak peeks of the blog. Take a look at It.
The Custom ONE
Here is one more printer which is much cheaper than Gemini XS but it’s quite hard to get this printer. And this is a DIY custom IDEX Printer. Yes, it is true you can make your own IDEX printer but it’s a two-way deal. For getting an IDEX printer or making your own you have basic knowledge of electronics, coding, and circuits. This printer is the cheapest of the cheapest printer So let’s see that:-
If you already made a cartesian printer with mega2560 and RAMPS you do half of the work. For converting your printer to Idex Printer you need to switch to marlin 2.0 and modify its configuration. h, configuration_adv.h, and RAMPS_PIN.h file. Also, you need another stepper driver and MOSFET PWM controller circuit to fulfill the required hardware need. IDEX it’s consists of two x-axis motors. Three Heaters and Two-layer cooling fans are controlled by a PWM signal which then amplifies by MOSFET. Form Three heater two heaters are used for the individual hotend head and the remaining heater is used for the bed.
When you read the RAMPS_PIN.h file you find that many pins on mega are left unused. This unused pin helps you by adding an extra Stepper driver, one Heater controlling PWM pin, and one layer colling fan PWM pin. You can make these circuits by yourself but if you want the professional look then you can also purchase them from an online store.