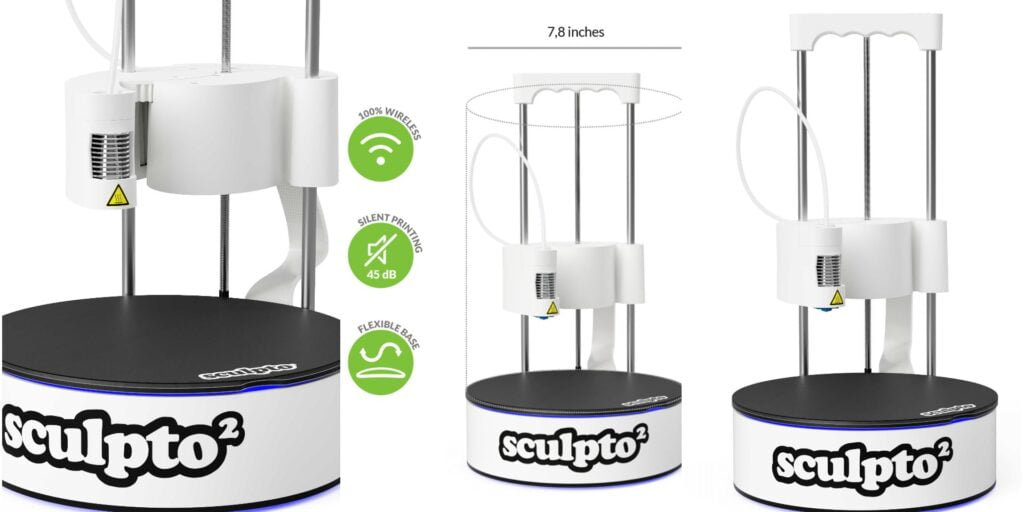
If you want to print without any hassle or teach kids about 3d printing then Sculpto pro2 3d printer is here. It comes pre-assembled by the production line. Just add a build plate and you ready to go. It is completely wireless you so you can use your mobile, tablet, or PC through Sculpto App to interface with the printer. In the Sculpto app, you get access to 1,00,000+ designs.
Your conventional 3D printers come with a fixed bed over which the extruder moves in the x-axis, y-axis, and z-axis. You may have also seen 3D printers with beds moving back and forth. But, this Sculpto Pro2 has a rotating bed, yes a rotating bed.
The Sculpto pro2 3d printer has a double rotating axis. One for the build plate and one for the extruder. It is an upgraded version of Sculpto+. Both versions of the sculpto Printer have the best safety measures, which everyone wants to be looked at.
Sculpto Pro2 3D Printer
Specification
First we will talk about the general dimensions, layer height, material type etc. of Sculpto 3D Printer. We are choosing these because these are common characteristics of every 3D printer.
| Build Volume | 200 x 200 mm (OR the size of a football) |
| Material | 1.75 mm Sculpto PLA |
| Hot End | Original E3d V6 |
| Steeper Drivers | TMC 2208-LA |
| Layer Height | 0.15mm to 0.4mm |
Sculpto Pro2 3D Printer
Assembling Sculpto Pro2
- Sculpto pro2 3d printer arrives pre-assembled. But there are some things that we have to do.
- Add built on the z-axis, just palace it on z rotating axis and rotate till it snaps. The build has a flexible magnetic sheet.
- After that plug your printer power supply in-wall outlet and connect to the printer. Turn on the switch.
- When the yellow light starting flashing printer is ready to connect to the app.
- You can download the Sculpto app from their official website.
- Now just follow the following steps to get your first 3D print.
- Open app.
- Create account.
- Go to the printer and click on connect the printer.
- Enter your printer serial number.
- Add Printer to your Network.
- The printer Light became Solid White so the next step is to calibrate Z-axis
- In the printer, menu click on calibrate z-axis.
- Use a piece of paper to calibrate precisely. Use a threaded rod for lowering the nozzle.
- Adjust until you pull out the paper with a bit of friction.
- Now calibration is complete.
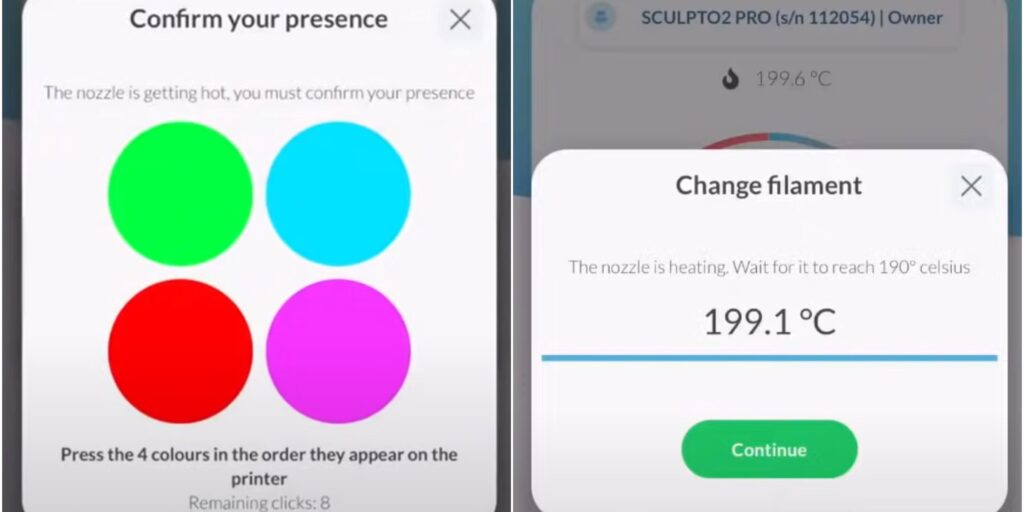
- To add filament to the printer click on change filament in the printer menu.
- Do presence test by tap color in the same sequence the printer shows.
- Chose filament type and wait until the hot end is heated up.
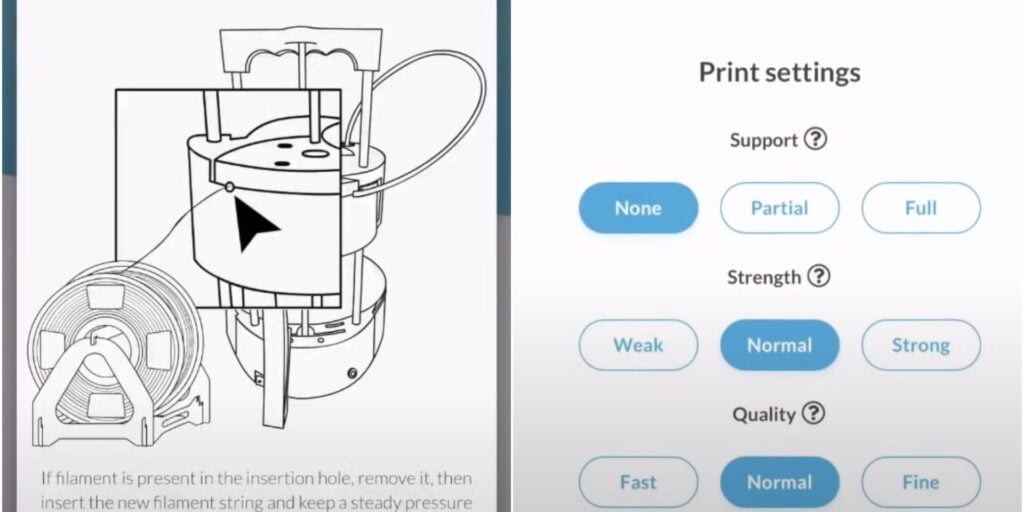
- Add filament from filament hole and keep soft pressure until printer self pulling in the filament.
- Click on done.
- Clean spill filament from the nozzle.
- Voila! you ready to Print.
Sculpto Pro2 3D Printer
Starting Your First 3D Print
- Browse any 3d models from the app, in-app you get 10,000+ pre-made STL models. These are provided by Sculpto for free. Or, you can add your own model.
- Choose the print quality and support types.
- Confirm the presence test.
- Wait for heating up your nozzle.
- That’s it your printing should be started.
We printed our self designed PixHawk Top Cover and it gave good results. it is in stock right now in our products page. You can buy it for free, but the free version will have our essentials engraved on it. Other buying options without essentials are also available. In case of any query contact us immediately.
Sculpto Pro2 3D Printer
Print Performance
Sculpto Pro2 3d Printer has TMC2208 -LA under the base thus it produces very low noise through the stepper motors. It is said by the company that its noise level is lower than 45dB while printing. So you can use this printer even in your bedroom. You can give printing instructions and go to sleep.
The swivel mechanism of Sculpto Pro2 makes it different from other FDM printers. These dual rotating mechanisms make printers fast and reduce print time. Sculpto pro2 does not have any weight on the hot-end so the hot-end can move speedily in any direction.
Sculpto Pro2 3D Printer
Body Construction
Overall printer build quality is rigid. The bottom part of the printer is made of Industrial plastic. The z-axis build is also rigid and works pretty fine. Also, the Extruder and hot-end part also made of plastic. The linear Bearing of the z-axis is smooth and the threaded rod did not bubble.
Print Options
Sculpto app gives you three print quality options Fast, Normal, and Fine. While observing the print of each quality, the Fine option gives you the best result. This printer is for kids and beginners so you have to compensate a little bit with quality.
Fexible Build Platform
The Build-platform of the Sculpto Pro2 3D printer has a flexible magnetic sheet that attracts the base plate. So you do not require to remove the entire build plate from the printer to remove the print. You only need to remove the upper flexible sheet to take your print. Flexible Sheets allow users to remove print without the use of any force. Just bend the sheet and your print gets removed from the build sheet.
Sculpto Pro2 3D Printer
Pros and Cons of Sculpto Pro2
| Pros | Cons |
|---|---|
| Easy to use. | Suitable for beginners |
| Safe and secure. | App slicer has fewer features |
| User-friendly app | Print quality, not a premium |
| Very silent | Hot-end is plastic |
| Easiest assembly | Only Low-temperature filament |
| Lightweight | Could not access parts |
Pros in little detail:-
- Easy to use for kids as it does not require much assembly or inputs.
- As there are very few open parts so chances of injuries are very less.
- Large print volume.
- App provides user-friendly connectivity for kids, simple interface.
- Easy to assemble did not require any mechanical tools to start.
- Access through wifi no hassle of wiring or transferring files through SD cards.
- Very silent 45dB noise level, one of the best features.
- You can also use environment-friendly PLA filament.
- Printer Body made of plastic so it is very lightweight.
Cons in little detail:-
- Only for beginners and for those who only want to print 3d parts from the internet without hassle.
- Due to the presence test, you can not print from anywhere in your house you need to present at the time of start print.
- The built-in slicer of the app did not provide as many features as another slicer provides
- The sculptor has only a wifi interface it did not provide any other interface.
- You can not calibrate the extruder feed rate.
- The Hotend part has a plastic casing so you did not use any high-temperature filament material.
- Due to the limit of temperature, you can only use PLA Filament or for the best result, you need to use Sculptor PLA.
- Due to Compact Design, you can not access Mainboard, Motors, and Extruder Directly.
Sculpto Pro2 3D Printer
Conclusion
Sculpto Pro2 3D printers are simple and easy to use. It is best for educational purposes for kids and also useful for beginners. It has many Safety levels and it is friendly to work with as it is very quiet.
The printer Build Quality is good. But if any hobbyists want to use this printer so it is difficult for it because of the absence of another interface. Also upgrading the parts of the printer little tedious due to its compact design.
Does Sculpto Pro2 has removable heat bed?
Yes, the heat bed of the Slupto Pro2 3d printer is kept in place with the help of magnets. Thus, it becomes very easy to remove the bed after printing is finished.
What is most important drawback of Sculpto Pro2?
In my opinion, the extruder part of Sculpto Pro2 is the weakest part of the printer. As it is made of plastic it can’t reach higher printing temperatures i.e. 210-220. You have to use low-temperature filaments for printing.


