3D Printers are the best and creative method to showcase your creativity, designing skills, and hobby. You can use it to print some prototypes you have designed and perform experiments on it. The number of uses of a 3D printer is unquantifiable. But, the only problem with them is that they are too expensive. A simple small printer will easily cost around $300 to $350. This could be solved by a homemade 3D printer, which could be easily made for under $150.
A 3D printer is a machine that converts all your designing files into a physical product. A simple definition is that this printer converts a digital file with 3D dimensions into a physical product. It prints layer by layer and uses additive methodology.
What we will be making?
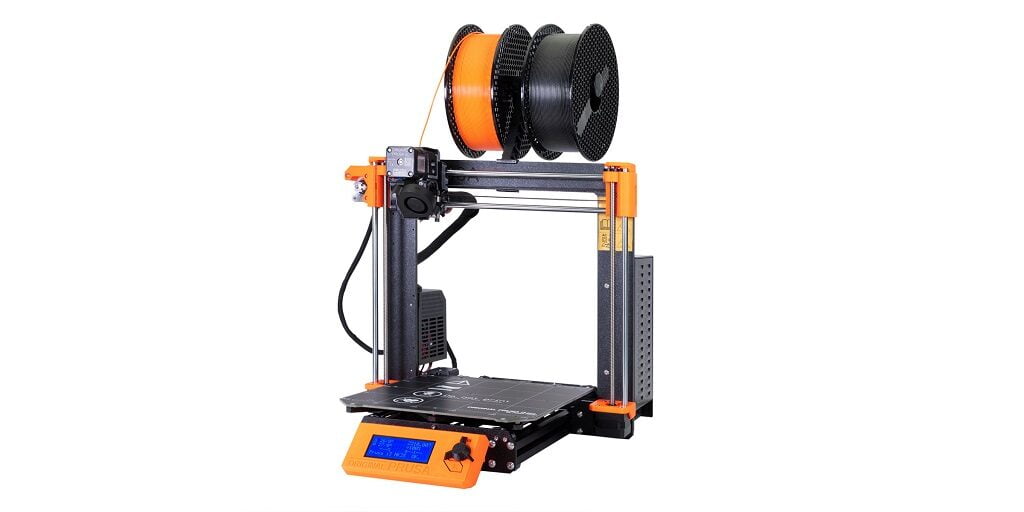
In this post, we are going to help you make a customized Homemade 3d Printer version of the Prusa i3 model. This is an FDM(Fused Deposition Modeling) printer having a print volume area of 220mm x 220mm x 250mm.
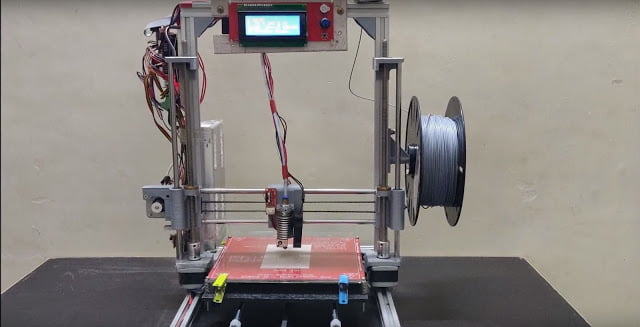
An image of the original model along with the 3D printer that we will make is given below to give you a better idea.
We will talk about the Prusa i3 model in detail in another post, let’s focus on making a homemade 3D printer. We will start by explaining to you about parts to be used and their approximate prices. Then, we will do the assembly of all parts, then electronics. Finally, a test print and that’s it your homemade 3D printer is ready for under $150.
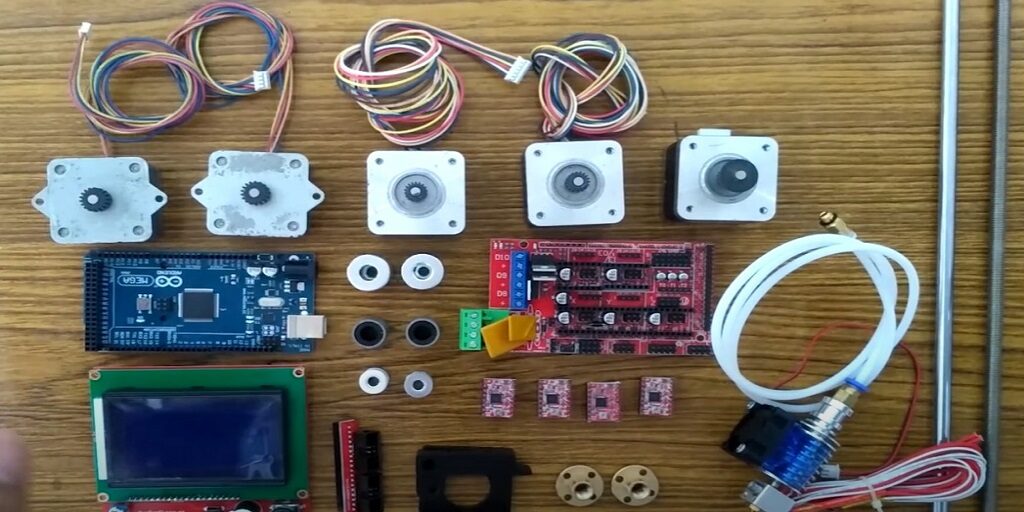
Step 1: 3D Printer Parts
Mechanical And Hardware Parts
Parts required for the structure and working of our homemade 3D printer are mentioned below.
| Part | Quantity | Approx. Price (India) (in $) |
|---|---|---|
| Wooden Sheet | 350 mm x 120 mm | 1.00 |
| Aluminum Fibre Sheet | 3.00 | |
| M4 Nuts | As Required | 0.25 (10 Nos.) |
| Zip-tie | 1 Packet | 0.75 |
| PVC Pipe | 265 cm | 1.50 |
| PVC Pipe 90 Deg Connector | 6 | 1.50 (1 Nos.) |
| PVC Pipe T Connector | 2 | 0.70 |
| MK8 Extruder | 1 | 8.00 |
| Bed Leveling Screw and Nut with spring | 4 | 3.50 |
| M8 Threaded Rod 38 cm with Nut | 2 | 7.50 |
| LM8UU Linear Bearings | 12 | 12.00 |
| 16 Teeth Pulley 5mm Dia | 2 | 3.00 |
| GT2 Timing Belt | 140 cm | 8.00 |
| Coupling Shaft (5mm X 8mm) | 2 | 4.00 |
| Steel Rod 8mm Dia 500mm Length. | 6 | 12.00 |
| Bearing with an internal diameter between 8 to 8.5mm | 2 | 1.00 |
| Total | $ 67.70 ~ $ 68.00 |
Electrical Parts
| Part | Quantity | Approx. Price (India) (in $) |
|---|---|---|
| 12 Volt 20 Amps Power Supply | 1 | 14.00 |
| Copper Wire different AWG for wiring | 1 m | 0.25 |
| Arduino Mega | 1 | 10.00 |
| Stepper Motor Drivers | 4 | 5.00 |
| NEMA 17 Stepper Motor | 5 | 25.00 |
| End Stops | 3 | 3.50 |
| Heat Bed Thermistor | 1 | 1.25 |
| E3D Hotend | 1 | 9.00 |
| Heat Bed | 1 | 8.00 |
| Ramps 1.4 | 1 | 6.00 |
| Total | $ 82.00 |
Total Price of both Mechanical and Electrical parts = $68.00 + $82.00 = $150 as promised.
- Stepper Motor Drivers (4 Nos) – 1 driver will control 2 Z-axis stepper motors, others will control one stepper motor each.
- NEMA 17 Stepper motor (5 Nos) – 1 for the X-axis, 1 for the Y-axis, 2 for Z-axis, and 1 for the extruder. I’ve used ‘NEMA’ motors which gives me a torque of 4.2 kg/cm.
All buying links are given in the description of following You Tube video link.
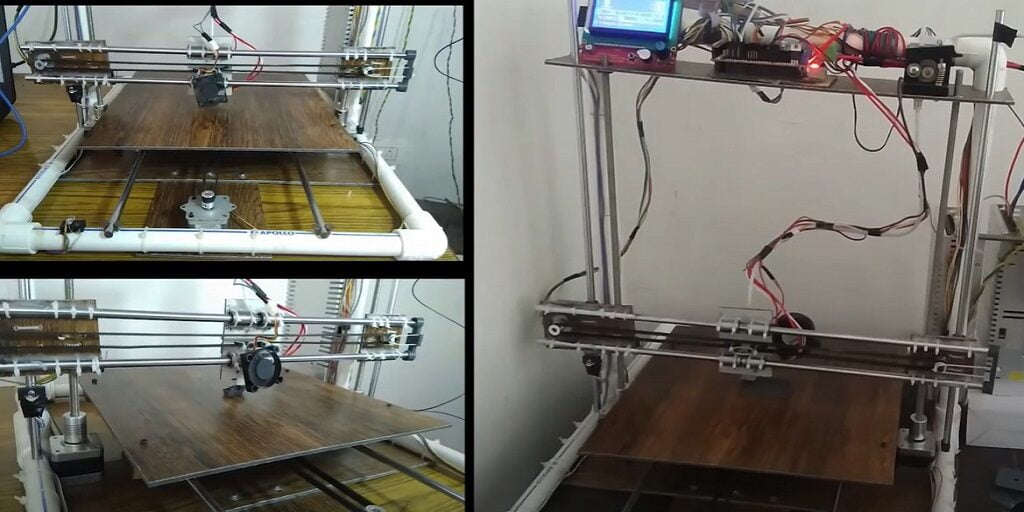
Step 2: Frame Assembly
This is a Homemade 3d Printer so we use PVC pipe for the frame. The total Lenth of PVC pipe is 265cm. Cut two pieces of 400mm, three-piece of 350mm, two pice of 250 mm, and two-piece of 150mm. Assemble the bottom of the frame accordingly to the below diagram.
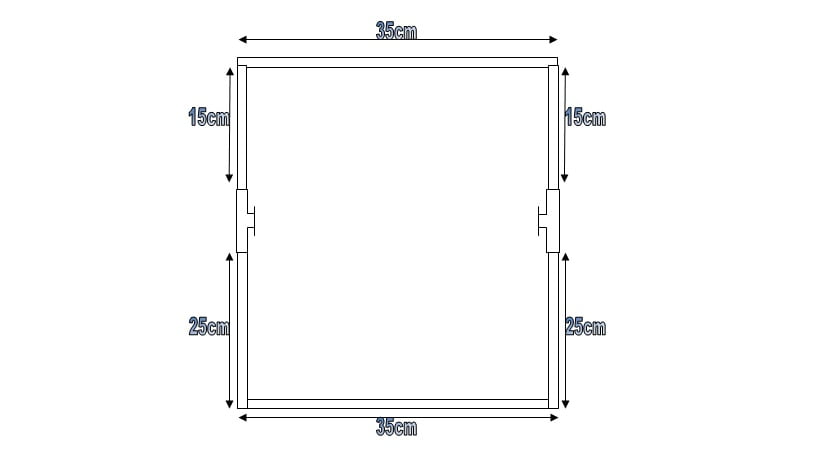
Take two 40 cm Pieces and One 35 cm Piece to assembles the upper part of the frame. Attach both the upper and bottom parts of the frame. the final assembly of the frame will look like this.

Step 3: Preparing (X, Y, Z) Axis
Preparing Z-Axis
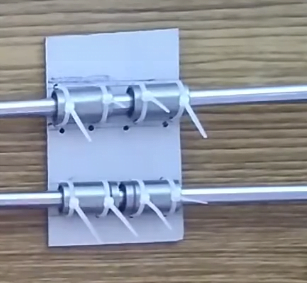
- Cut 33 x 10 cm square aluminum sheet.
- Place it below T- joints, screw the sheet with PVC pipe to secure its place.
- Now put the stepper motor at both T- joints.
- Mark stepper motor position on the sheet for drill hole.
- After the Drill hole screw both stepper motors in their place.
- Now connect coupling to both motor shaft.
- Connect thread rod to coupling.
Preparing Y-Axis
- Use four Wooden sticks to form a 250 x 250 mm square.
- Attach two linear bearings on the parallel side of the square.
- Slide the smooth rod on both sides of the square.
- Screw smooth rods on PVC pipes to secure them.
- Add Another 8 x 8 cm square on the Back of the PVC pipe of the printer you can make any side of the 350 mm PVC pipe back or front of the printer. In my case, I have chosen direction towards 150mm PVC pipe which is the back of my Printer.
- Screw the square with PVC pipe and Screw the Stepper motor on it.
- Add 16 teeth pully on the Motor shaft.
- Add another pully screw in the front pipe of PVC for timing belt rotation.
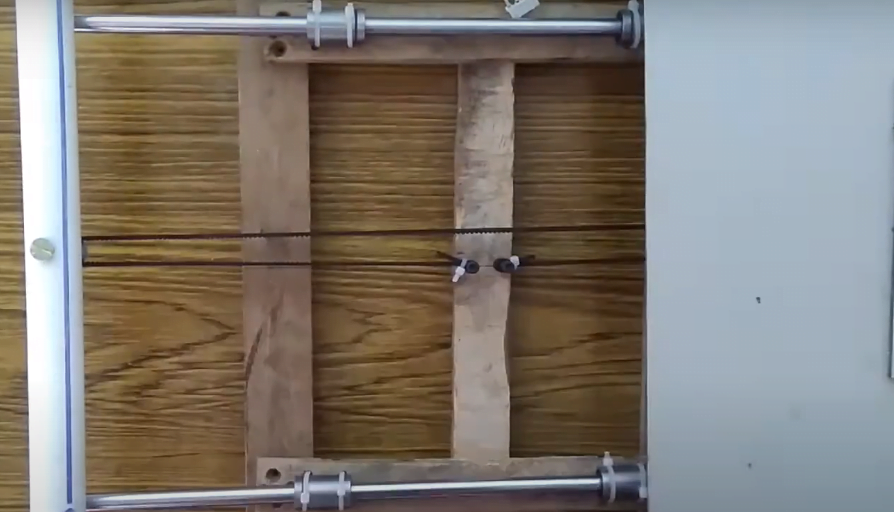
Preparing X-Axis
Cut 8.4 x 5..5 cm square. Use four Linear Bearing for the Hotend slider attach them to a square piece by a zip tie. In the above image. Now Cut a 10.3 x 6 cm square piece of aluminum sheet. Use NEMA 17 motor layout for drill hole precisely in sheet. Also, drill holes for Linear bearing and Thread rod nut.
Screw the Motor and Zip tie the Linear bearing and Thread rod Nut. Add 16 teeth pully on the Motor shaft. Use another 8 x 6 cm square piece to make another end of the x-axis drive. Attach 16 teeth pully on it for timing belt rotation. Drill hole for Linear bearing and threaded rod Nut. Zip tie them also.
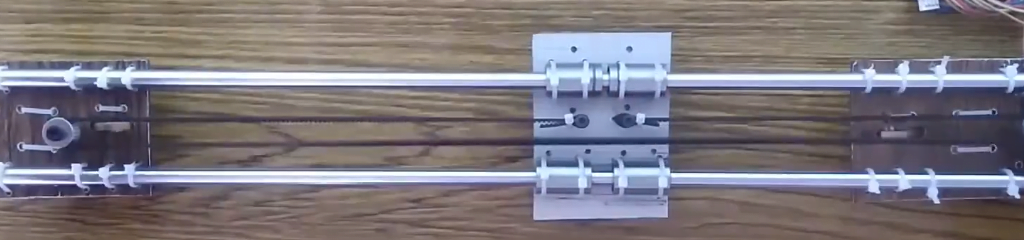
Now slide two smooth rods in the extruder slider and attach both ends of the x-axis assembly to complete the assembly.
Step 4: Add Timing Belt
First Add timing belt on Y-axis. Make A Loop At the Open end of the timing belt and tighten it with a zip tie. Take two a Screw and tight it Below the y-axis slider in a straight line. Connect the timing belt loop to one screw and then measure the length and Tension on the timing belt for the smooth operation of the Slider. Make a loop of another end of the timing belt and put it in a screw. Your connection will look like this.
For X-Axis do the same method. The X-axis will look like this.
Step 5: Final Parts Assembly
Add X-Axis on Z-Axis Threaded Rod
Cut 250 x 250 mm Aluminium sheet. Put heat-bed on the sheet and mark the position for the screw hole. After the drill hole screws the sheet on the y-axis wooden frame, then use the bed leveling screw to secure the heat bed on an aluminum sheet. Put x-axis assemble on z-axis threaded rod and rotate the threaded rod till x-axis reach down.
Cut 350 x 120 mm Wood sheet, drill a large hole for fitting it in the upper part of the frame. Also, drill a hole for threaded rod supporting bearing by measure its position so you can precisely drill the hole. screw the sheet in the frame. Make sure that the threaded rod support bearing and motor are in a straight line.
Take E3d Hot-end and screw it on the x-axis Hot-end slider. Unpack the extruder assembly and assemble it on the stepper motor. Screw the Extruder motor on the upper top sheet. Connect the PTFE tube between Extruder and Hot-end.
Connect Arduino Mega and Ramps Shield. Put all jumpers on all four driver jumpers pin, Connect X, Y, Z, and E0 Stepper Driver. Connect display cable connector on Aux-3 and Aux-4. Place all Assembly on Upper Sheet. Attach all three end-stop right next to each Axis Motor. Screw the Display Unit also on the Upper top sheet. Screw the Power Supply Unit on side of the frame Vertically.
Step 6: Electrical Connection
- Use copper wires to connect the power supply, Ramps 1.4 shield, and the Heatbed for better working of the printer.
- Connect all Motor to ramps shield.
- X-Axis motor to Ramps X stepper motor male pins
- Y-Axis motor to Ramps Y stepper motor male pins
- Z-Axis motor to Ramps Z stepper motor male pins
- Extruder motor to Ramps E0 stepper motor male pins
- Connect End-stops to Ramps
- X-Axis End-stop to X – min
- Y-Axis End-stop to Y-min
- Z-Axis End-stop to Z-min
- Connect display unit cable to Exp1 and Exp2
- Heat-bed wire to Ramps D8
- Hot-end Cooling fan to Ramps D10
- Layer cooling fan to ramps 12v Aux
- Heat-bed and Hot-end thermister
- Connect Nozzle Heater to Ramps D10
- Now Connect Power Supply output cable to Power connector of Ramps
- The Heatbed thermister is placed at the center of the heat bed and above it, a glass plate is placed.
Step 7: Wiring diagram of your DIY 3D printer

All the parts are connected as shown above and are secured with zip ties.
Step 8: DIY 3D printer Arduino coding
- Connect the Arduino mega from the PC with the help of the data cable.
- Then download the file from the link given below.
3D Printer Code
- Then follow the commands:
- Open File 3D Printercode.rar > Extract her
- Open Marlin-1.1.x > Marlin > Marlin.ino
- If you have to make changes in the code then select Configuration.h or else the code is already set for the above printer.
- Select the port and board( Arduino Mega 2560)
- Select Compile > Upload
- Then your printer is ready for work.
Step 9: Testing
Power up the printer. In the firmware maximum limit of the printer, and the size is already set so you do not need to require to set the limit. But feel free to change them accordingly to your design.
Test motor direction if any motor rotation is the wrong swap it coils wire and test again. Homing the stepper motor and calibrate steps/mm. Put filament in the Extruder and calibrate the extruder feed rate. Level the heat bed. Now your printer is ready to print.
Normal 3D printed models need some smoothening for final look. Thus we use PLA smoothing techniques, you can visit our blog on this.
PLA smoothing: The Best Non-Toxic, Hassle-Free Method
Step 10: Printing
Before starting the print, you need a CAD file in .stl format.
You can use your own .STL file or download one from our product page.
There are so many software for 3D printing like:-
- Simplify 3D (paid),
- Pronterface (Free)
- Cura Slicer (Free)
- Repetier Host (Free)
We’ll recommend Repetier host as it is user-friendly.
See the Printing steps in DIY 3D Printer Printing and Testing.
If you have any queries regarding parts or construction feel free to ask in the comments. 😃
Homemade 3D Printer FAQ:-
A 3D Printer is mainly made of two types of parts i.e. electrical and mechanical parts. Mechanical parts cost around $68 while electrical parts cost around $82. Thus, you can have your homemade 3D printer for just $150.
The costliest part in a homemade 3D printer is 12 Volt 20 Amps Power Supply which cost around $12. Price can vary as per your location.
Pros and Cons
This Homemade 3d Printer is highly customizable. You can use Aluminium tubing instead of PVC pipes or Use Linear Rail instead of Smooth rod and linear bearing.
This homemade 3d Printer is made under $150 so the major con is that we did not used enough high-grade parts, but if you want to use it then you can add them.
This is a Homemade 3D printer at a very affordable price. It is only limited to your curiosity. You can also convert it to a high-end precise one. This homemade printer can be built in a very short time and you can start your prototyping.
Bhai jo upgraded 3d printer hai uski koi blog post hai? kio ky video main shi smjh nhi arha kha konsi dimensions lgai hain
thanks for the post. I cannot find the code
We will upload it very soon in the products section and also mention it in the post. It will be free of any cost.
Hi bro, amazing build, but the code is not free?
Hello, Sorry it was earlier provided free, but we have to charge a nominal price for sustainability.
You can follow the given link for your first calibration print