Well, you might have surfed over the internet or watched countless videos explaining how to 3D print transparent filaments. A clear 3D printing model requires a number of things. It can be bit of a problem. No 3D printer is available to produce 100% transparent 3D prints but after some printer and slicer settings and post-processing, you can get near to crystal clear transparent filament printed model.
What are the general transparent filament settings for slicers to look for? The most common transparent filament settings for Slicer are printing Speed, Flow-rate, nozzle temperature settings, etc. You can tweak these options to get a better result with your transparent filament. We have discussed them in detail in the post below.
A fresh transparent filament ends up with a translucent milky material. The air bubbles and layer lines are two main things that are to be dealt with while printing. Ignoring these factors may lead the parts to be milky, white, or opaque. Air bubbles have a tendency to bounce backlight inside the material. The layer lines act as a lens that bounces light around inside them.
The best you can achieve is a very translucent 3D printing technique. It means, a little see-through and fair clear finished/printed correctly. In the article below, we will be dealing with a few settings that may provide you with the best clear results.
In The Post:-
- Printer Speed Setting
- Flow Rate Setting
- Nozzle Temperature Setting
- Infill Setting
- Transluency in Transverse Plane
- Layer Height Setting
- Z-Hop Setting
- Retraction Setting
- Line Width & Height Setting
- FAQ on Transparent Filament
- Conclusion
General Slicer Settings
Printing Speed Setting
A good printing speed ranges from 15-20mm/s. Even if the nozzle is moving down from one location to another, slow the speed down for better results. This helps inaccuracy, ensuring that layers are laid down exactly where they need to be to achieve complete fusing.
Steps for setting printer speed for transparent filament. We are using Cura Slicer here although for all slicers steps are approximately the same.
- Go in the Print Settings, under Speed dropdown or you can also search “speed” in the search settings bar.
- Now, you will get various options, set them as shown below.
- Print Speed: 15 mm/sec.
- Initial Layer Speed: 20 mm/sec.
- Initial Layer Print Speed: 20 mm/sec.
- Initial Layer Travel Speed: 20 mm/sec.
- Z Hop Speed: 10 mm/sec.
You can also set them between 15 – 20 and check the results, fix it at the best possible results you get.

Flow Rate Settings
Increase the flow rate of the material coming out of the nozzle. The normal flow rate is at 100 percent. To prevent cranking, take a range of about 105-107%. Pushing the flow rate to about 115% prevents air bubbles inside the materials. It increases the strength and improves the transparency of the infill parts. Light bends repeatedly when transitioning from plastic to air, resulting in a finished print that is absolutely not transparent.
Steps for Flow Rate Settings for Transparent Filament
- Go in the Print Settings, under Material dropdown or you can also search “flow” in the search settings bar.
- Now, you will get various options, set them as shown below or you can set them anywhere between 105-110 depending on the print results you get.
- Flow: 107%
- Wall Flow: 107%
- Outer Wall Flow: 107%
- Inner Wall Flow: 107%
- Top/Bottom Flow: 107%
- Infilll Flow: 107%
- Skirt/Brim Flow: 107%
- Prime Tower Flow: 107%
- Wall Flow: 107%
- Initial Layer Flow: 107%

Nozzle Temperature Setting
Increase the extruder nozzle temperature by around 5 degrees, also the temperature setting is very different for all of the printers so keeps on increasing until you get the desired result. A higher temperature enables the layers to fuse together correctly and even perhaps more so than normal.
Steps for Settings Temperature in Cura Slicer for Transparent Filament.
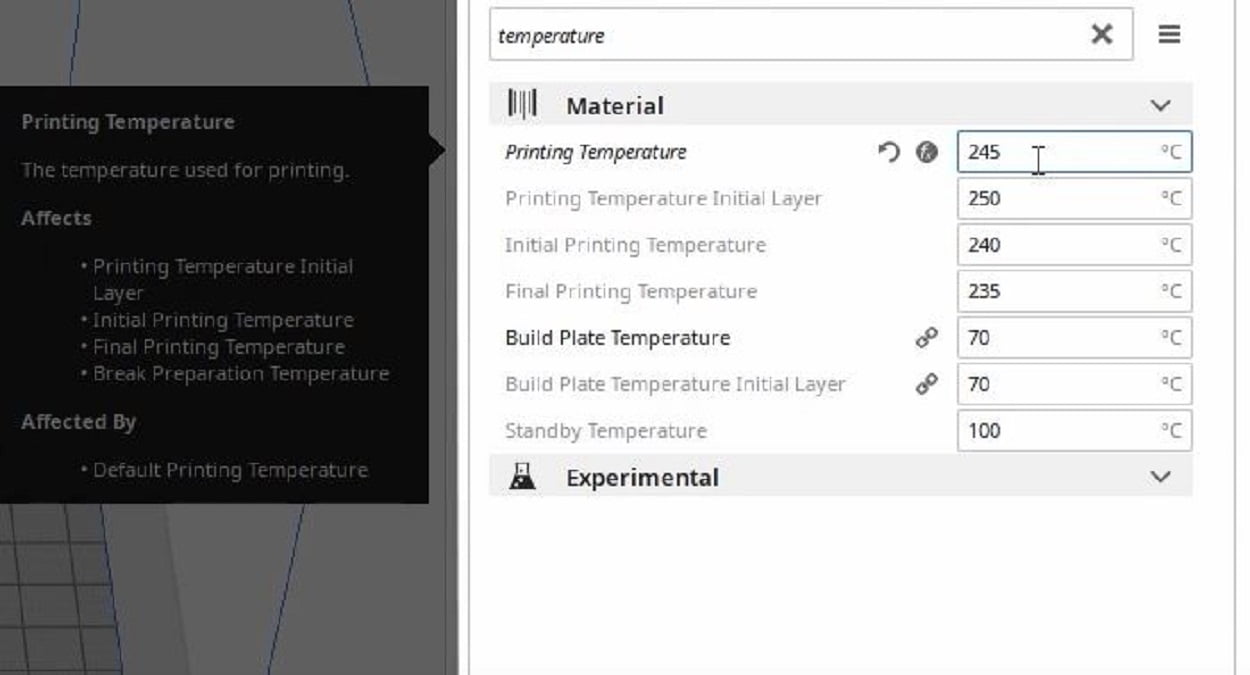
- Go in the Print Settings, under Material dropdown or you can also search “Temperature” in the search settings bar.
- Now, you will get different options for temperatue (shown in image below), set as shown below.
- Printing Temperature: 245 oC.
- Printing Temperature Initia Layer: 250 oC.
- Initial Printing Temperature: 240 oC.
- Final Printing Temperature: 235 oC.
- Buil Plate Temperature: 70 oC.
- Build Plate Temperature Initial Layer: 70 oC.
- Standby Temperature: 100 oC.
Infill Settings
One thing is clear that more the material more is the chance of light getting refracted and bounced, thus our ultimate aim is to keep the material as low as possible. The same goes with infill, if there is more infill it will reduce transparency by some degree.
So if the parts are hollow, then do so. Or use a very low infill percentage like 5 percent.
Other Technical Transparent Filament Settings
Improving transparency from certain directions can result in other directions becoming more opaque. 3D printed components are well built-in in certain directions. There are different orientations that allow for better transparency than others. A perpendicular orientation improves the transparency of materials while printing.
Transluency In Transverse Plane
An object that is printed can be seen from two different orientations to see the translucency. A transverse plane allows more lines to get through the material than the coronal plane.
This method minimizes the potential for little air bubbles or gaps to exist like before, to prevent internal scratches to occur.
Layer Height Settings
An 0.1mm, ensures that no gaps are left in corners where a thicker line would not be able to get to the next.
Coming Mode Settings
Turn the settings off for coming mode. It prevents scratches on the transverse plane surface.
Z-Hop Settings
Z-Hop whenever retracting and increase Z Hop amount
The Z-hop setting prevents the nozzle from scratching across the transverse plane surface, whenever possible.
Retraction Settings
Increase the retraction settings until the nozzle no longer leaks during a travel movement. And increasing retraction speed is also very helpful. Increase it up to 5mm to avoid burn marks.
CPE may be a material particularly susceptible to stringing (caused by nozzle leaks) and to stop that some tinkering of the Retraction Speed is additionally necessary. This is often to stop stringing from build-up which may then cause burn marks if the nozzle of the printer goes across it.
Nozzle Diameter Upgrades
This can be achieved by swapping out the nozzle diameter. Smaller nozzles produce stronger components. And it is the easiest way to 3D print that component. It gives good detailing at a longer print time.
Line Width & Height Settings
The main objective is to create large cylindrical lines so that internal refraction is minimized. It may lower the resolution of your print. This minimizes the layers and internal reflections. Changing these settings, lower the overall resolution of the print.
Keep in mind post-processing can do this well. So, compromises have to be made.
FAQ’s On Transparent Filament
A PETG perhaps is the most transparent 3D printer filament to achieve the best results. For a strong, durable clear filament –one of our translucent PETG colors (or the natural)might be the best fit.
It is one of the most notorious filaments because PETG is hygroscopic, you need to dry your spool before using it.
The best and most commonly available clear or translucent 3D printer filaments are PMMA, PETG, PLA, Trans Clear ABS, and Polycarbonate.
Conclusion
3D Printing is a difficult task. Even the slightest changes or miscalculations can ruin or devastate your print. Be it the nozzle temperature, printing speed, or cooling effects. There are various methods, while a few have been discussed above. Every filament or printer often requires its own specific settings. You may experiment with the best printing and post techniques for good or better results.
In case of any doubts or you would like to share your experience on printing filament settings, feel free to write in the comment box.