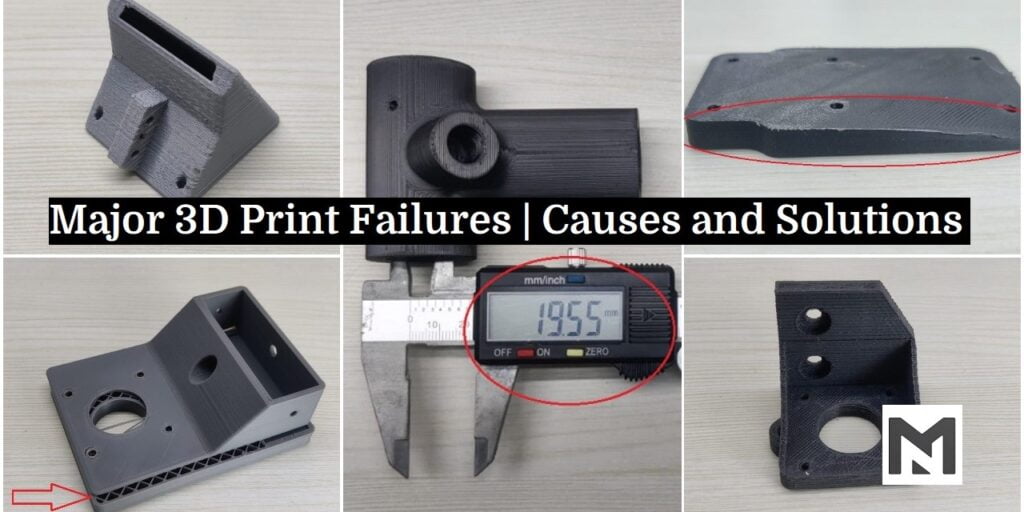
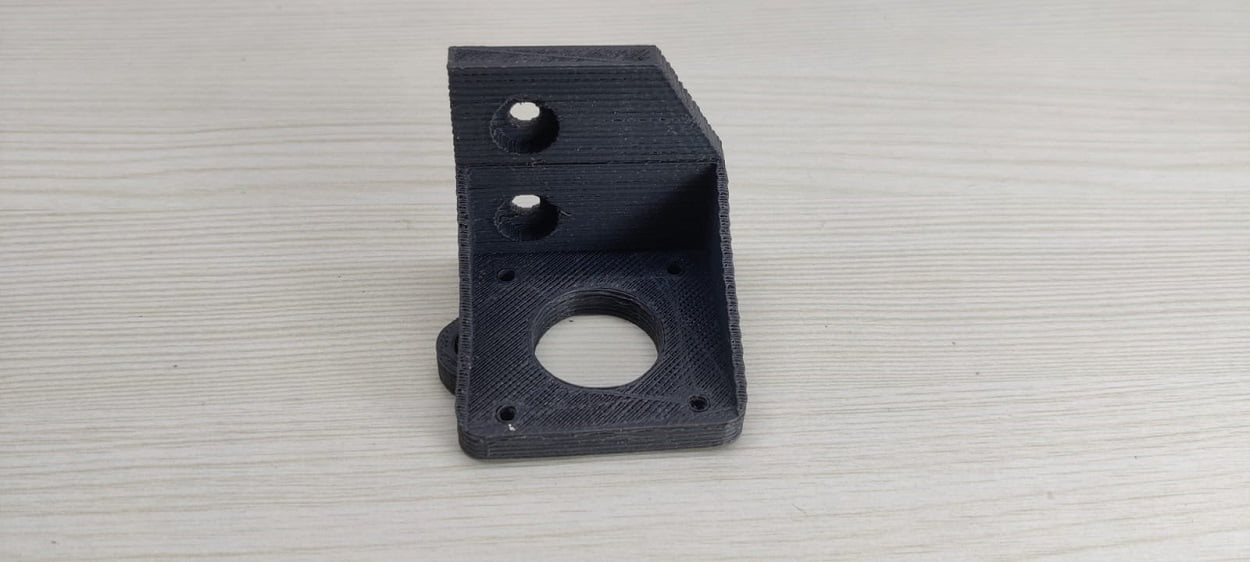
When starting with something fresh we are unaware of the failures we will face. A similar thing is true with 3D printing also, as we indulge ourselves more and more in 3D printing at some point in time we will face some common 3D print failures. 3D print failures are common at the initial stages of printing. There are multiple printing failures, like uneven printing beds, incorrect settings, or unusable prints.
What are the most common types of 3D print failures? Some of the most common 3D print failures are bed-adhesion, under extrusion, over extrusion, stringing, and overheating. There are many other 3D print failures that are pretty common but these 5 are the ones that affect our prints the most.
Therefore, we are here to provide you with the causes and best solutions to every 3D printing issue you could experience. A detailed explanation of the subject with its tips and fixes is discussed below. Let’s save you from long hours of frustration. Here, give it a read.
In The Post:-
- Dimensional Inaccuracy
- Under Extrusion
- Over Extrusion
- Stringing & Oozing
- Overheating
- Layer Shifting
- Clogging Of Extruder
- Warping
- Poor Bridging
- Bed Adhesion Failure
- FAQ on Print Failures
- Conclusion
Major 3D Print Failures 01/10
Dimensional Inaccuracy
If you are creating large assemblies or parts that need to precisely fit together, their dimensional accuracy is important. A standard accuracy of the printing methods helps in finding the common reasons behind print failures.
Accuracy varies depending on which material you use to print, and the mechanical properties of those materials.
| Causes | Solutions |
|---|---|
| Dimensional error | Precise dimensional settings and calibration |
Note: Red-colored headings are causes of Failure and green-colored headings are Solutions.
– Dimensional Error
If you notice that the dimensional error tends to extend as you print larger parts, then there’s a special setting you’ll adjust. for instance, if your print was 0.1mm too small for a 20mm wide part, but increased to 0.5mm too small for a 100mm wide print, then it’s likely the matter could also be thanks to thermal contraction. this will be a standard issue for top-temperature materials like ABS since plastic tends to shrink because it cools.
– Precise Dimensional Settings & Calibration
Make sure to precisely offset the edges of your prints. Like, setting the worth to -0.1mm will shrink your model by 0.1mm in the X and Y directions. It works best when the dimensional error is consistent, even when printing models of various sizes. If the part is always 0.1mm too large, regardless of the size of the model, this setting easily accounts for the difference.

You can see our blog on Dimension calibration prints settings and download calibration cube for FREE

Major 3D Print Failures 02/10
Under-Extrusion
The 3D printer does not actually provide any observations about how much plastic actually leaves the nozzle, the software may not expect this much less plastic exiting the nozzle, which is also known as under-extrusion. Certain gaps start to appear between adjoining extrusions of each layer.
The best one can do is test whether or not the printer extrudes enough plastic to print a simple 20mm tall cube with at least two perimeter outlines. Check at the highest of the cube, to ascertain if the three perimeters are strongly bonded together or not. you’ll be under-extruding if there are gaps in between.
| Causes | Solutions |
|---|---|
| Inadequate filament diameter | Correct filament diameter. |
| Speed too high | Lower the speed. |
– Inadequate Filament Diameter
A wider filament has more friction in the Bowden tube and in the Teflon insulator. It may cause a bad impact on the quality of the filament, and will have more problems, more failed prints
– Speed Too High
The faster you do it, the sooner it will finish. Well, that’s wrong. People often increase the print speed to have it finish soon. This is also one of the causes of under extrusion.
– Correct Filament Diameter
The accurate values of the filament diameter should be 1.75mm and 2.85mm. Many packages do have the correct diameter settings on their plastics too.
– Lower The Speed
A good quality print takes 20mm/s and 50mm/s. If quality is not an issue for you, then increase the speed to 80mm/s or pay more attention.
Major 3D Print Failures 03/10
Over-Extrusion
In order to achieve good quality prints, the software should constantly work in order to make sure that the nozzle is extruding the correct amount of plastic. Many a time, most 3D printers have no way of monitoring how much plastic is extruded. This results in over-extrusion, which often ruins the outer dimensions of the parts.
| Causes | Solutions |
|---|---|
| Extrusion multiplier settings being off | Adjust your extrusion multiplier settings |
| Incorrect nozzle size | Determine the correct nozzle size. |
– Extrusion Multiplier Settings Being Off
Generally, in over-extrusion, an excess material extrudes than expected and thus leads to nozzle jams or stringing. An immediate need to lower the settings of the slicer software is needed.
– Incorrect Nozzle Size
Due to an incorrect nozzle size, it causes your parts to print with oozing blobs, droopy layers, and strings. Higher nozzle size may lead to any disastrous finish of your print.
– Adjust Your Extrusion Multiplier Settings
An extrusion multiplier controls the amount of filament coming out of the nozzle. If there are frequent nozzle jams or larger layers, you may say that it is due to the extrusion multiplier. The default settings in slicer software are 1, but you can adjust it anywhere between 0.9 and 1.1(depending on your filament type).
The values in the printer menu range from 90 to 100, but you can adjust the value as suits your need.
– Determine The Correct Nozzle Size
Nozzles are easily interchangeable. A size of 0.4mm is considered to be standard and ideal for most projects. You can also try smaller nozzles to help bring out more intricate details of your design without facing any extrusion.
Major 3D Print Failures 04/10
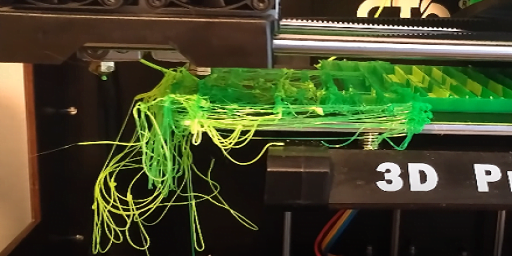
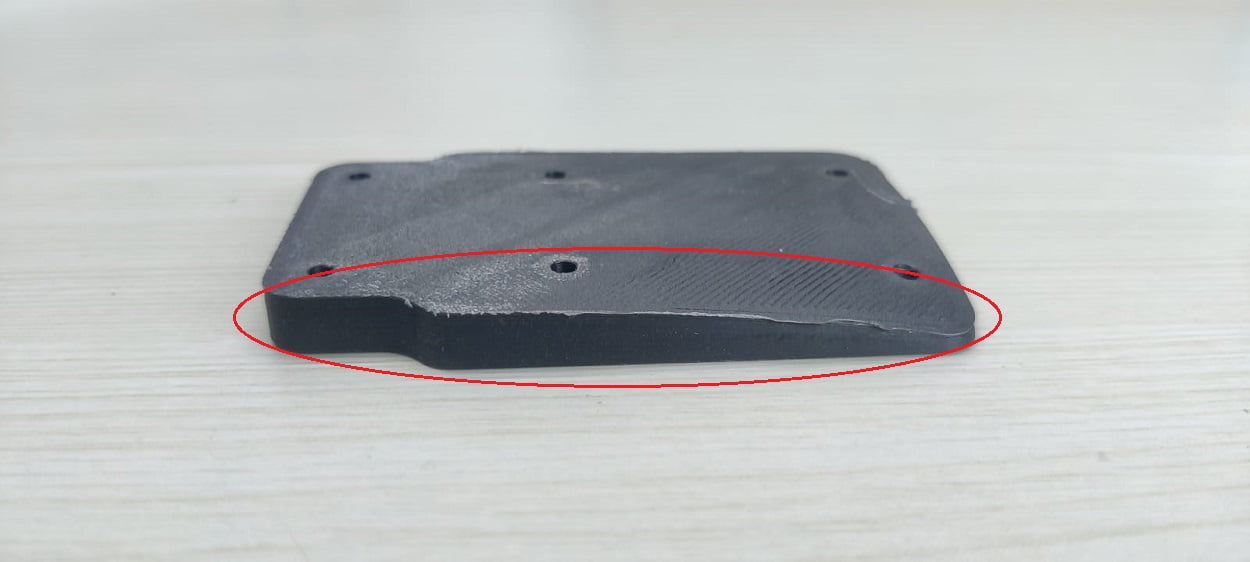
Stringing or Oozing
While printing, a number of the tiny strings of plastic are left behind on a 3D printed model. It happens when the plastic oozes out of the nozzle while the extruder moves to a new location. Such excessive stringing can be removed using a process known as, Retraction.
If retraction is enabled, when the extruder is completed printing one section of your model, the filament is going to be pulled back into the nozzle to act as a countermeasure against oozing. When it’s time to start printing again, the filament is going to be pushed back to the nozzle in order that plastic once more begins extruding from the tip.
| Causes | Solutions |
|---|---|
| Temperature too high | Adjust heat bed temperature |
| Movement speed | Adjust long free travels |
– Temperature Too High
In case of high temperature, the plastic inside the nozzle becomes less viscous and leaks out of the nozzle much more easily. And also affects the print quality.
– Movement Speed
When the extruder moves between two different locations, and at that move, the plastic starts to ooze out of the nozzle. The length of this movement affects how much oozing takes place. Long movements are far more likely to make strings.
– Adjust Heater Temperature
A lower temperature will stop the oozing but may affect the print quality. Just in case, you still encounter extrusion issues, even after the correct retraction settings, decrease your extruder temperature by 5-10 degrees.
– Adjust Long Free Travels
By finding the shortest route to the next deposition point or the travel movements, it can control any crossing of the open-source altogether. It also eliminates the possibility of creating strings.
Major 3D Print Failures 05/10
Overheating
In order to maintain the exact dimensions of your 3D printed parts, a balance should be made between its heating and cooling, so that your plastic can flow freely through the nozzle. Sometimes, you may not achieve the balance, and see some kind of print quality issues where the exterior of your part is not as precise as you would like.
| Causes | Solutions |
|---|---|
| Insufficient cooling | Additional cooling measures. |
| Printing too fast | Adjust printing speed. |
– Insufficient Cooling
When the plastic does not cool down fast, the hot plastic freely changes its shape. It actually deforms the layers. The temperature may be about 250 degrees Celsius depending upon the type of filament.
– Printing Too Fast
Generally, there is less time for the layers to cool down sufficiently. Hence, the layers are printed too quickly, one after the other. It happens in small models, as the layers here get deposited in few seconds. The printing speed then gets delayed.
– Adjust Printing Speed
If you permit the software to regulate the printing speed for layers that take but 15 seconds to print, the program will automatically slow down the printing speed for these small layers. This is a vital feature for combating overheating issues.
– Additional Cooling
Additional cooling may help the plastic to retain its shape. A small handheld fan or an aftermarket fan can be installed or used to cool the layers faster.
Major 3D Print Failures 06/10
Layer Shifting
Most 3D printers use an open-loop system, which may be fancy thanks to saying that they need no feedback about the particular location of the tool head. The printer simply attempts to maneuver the tool head to a selected location and hopes that it gets there.
The stepper motors drive the printers quite powerfully, and there aren’t any significant loads to prevent the tool head from moving. The printer may be unable to detect the issue. The misalignment of layers in a print is usually due to the below-mentioned causes.
Each layer in an object of a 3D print works one layer at a time. The layers are printed on top of the previous layer, thus creating the desired 3D shape in the end. However, for the ultimate part to be strong and reliable, you would like to form sure that every layer adequately bonds to the layer below it. If the layers don’t bond together tolerably, the ultimate part may split or separate.
| Causes | Solutions |
|---|---|
| Toolhead moving too fast. | Control the speeds. |
| Mechanical or electrical issues. | Consult manufacturing company. |
– Toolhead Moving Too Fast
The higher speed of printing often makes the 3D printer struggle to keep up. A clicking sound is heard as soon as you attempt to move the printer faster. It fails to achieve the desired position.
– Mechanical Or Electrical Issues
Once in a while, the misalignment may continue, even after reducing the print speed. It is likely due to mechanical or electrical issues with the printer. The belts are typically made from a rubber material and reinforced with some sort of fiber to supply additional strength.
The belts stretch, and over time tend to lose. And, the belt may slip on top of the drive pulley, which means the pulley is rotating, but the belt is not moving. If the belt was originally installed too tight, this will also cause issues. There also are several other common electrical issues that will cause the motors to lose their position.
For instance, if there’s not enough electrical current going to the motors, they won’t have enough power to spin. It’s also possible that the motor driver electronics could overheat, which causes the motors to prevent spinning temporarily until the electronics calm down.
– Control The Speeds
The default printing speed controls the speed of any movements where the extruder is actively extruding plastic. The X/Y axis movement speed controls the speed of rapid movements where no plastic is being extruded.
If either of those speeds is too high, it can cause shifting to occur. If you’re comfortable adjusting more advanced settings, you’ll also want to believe in lowering the acceleration settings in your printer’s firmware to provide a more gradual speed up and hamper.
– Consult The Manufacturer
An overtightened belt can create excess friction within the bearings which will prevent the motors from spinning. Ideal assembly requires a belt that’s somewhat tight to stop slipping, but not too tight to where the system is unable to rotate.
Verify that your belts all have acceptable tension, and none appear to be too loose or too tight. If you think that there could also be a drag, please consult the printer manufacturer for instructions on the way to adjust the belt tension.
Major 3D Print Failures 07/10
Clogging of Extruder
Clogging means the blockage of the nozzle or extruder due to any of the given reasons i.e. over extrusion, moisture in the filament (See our guide on drying filament), Clogging due to unwanted particles, etc.
Here we are going to discuss nozzle-layer height and room temperature as the over extrusion has been already discussed and drying of filament is a separate article which you can access from the above link.
| Causes | Solutions |
|---|---|
| Incorrect nozzle height | Check layer height compared to the nozzle. |
| Incorrect room temperature | Use recommended room temperature settings. |
– Incorrect Nozzle Height
A larger nozzle height makes the print material travel a longer distance to reach the surface. This, in turn, makes it a cooler temperature and the material will likely have trouble adhering.
A very low nozzle height creates more undesirable things, like extruding. That results in smearing the thermoplastic all over the surface.
– Incorrect Room Temperature
A low temperature of the end of your print, will not melt your print material correctly. It adheres to the inside surface of the nozzle, resulting in the 3D printer being clogged.
Printing at a very high temperature causes heat creep. This mainly occurs when the temperature extends back and upwards from the hot end. This causes the “melt area” to increase father back also, softening and melting the print material well before the nozzle end of the extruder.
– Check The Layer Height Compared To Nozzle
Most 3D printing nozzles have a diameter between 0.3-0.5mm. However, these small nozzles may be a limitation for what layer heights can be used. The layer height should be 20% smaller than the nozzle diameter. This will allow the nozzle to take care of a small pressure to the highest of the extruded filament which will increase adhesion while avoiding retrograde extrusion.
– Recommended Temperature Settings
A temperature setting of 180 degrees Celsius for PLA and 225 degrees Celsius for ABS does well. Experiment with the fabric that you’re using and find the “sweet spot” that permits permanent adhesion and layering, but doesn’t cause problems like clogging.
When changing materials, make sure that the previous ones are completely removed and flushed through. Failure to do this causes a clogged nozzle.
Major 3D Print Failures 08/10
Warping
Warping is actually the deformation or curling of the print after the successful completion of one or two layers. This generally happens in larger models, with high-temperature materials such as ABS. The printing failure is so adverse, that may cause the entire model to either fall or separate from the bed.
| Causes | Solutions |
|---|---|
| Build plate adhesion | Lower plate temperature. |
| Build plate temperature post-print errors | Check bed level. |
– Build Plate Adhesion
At times the plastic print sticks to the build plate. In such cases, your prints curl, deform or potentially shift out of the surface.
– Build Plate Temperature
What actually happens is, that while printing very large or long parts with high-temperature materials, it tends to shrink almost 1.5% at room temperature. This may equate to several millimeters of shrinkage. As the print advances, the successive layers deform, leading the entire print to separate from the bed. This can be a challenging issue.
– Lower Plate Temperature
Materials like ABS have a set heated bed temperature of about 100-120 degrees Celsius, which will eventually reduce the amount of plastic shrinkage. Avoid any kind of cooling of the build plate. This is the main reason for the parts to shrink or warp.
– Always Check Your Bed Level
Calibrate the 3D printer bed so that it is leveled properly.
It is important to adhere the filament to the bed. Hence, make sure do not to stick too close to the build plate. Or the prints may rip off the previously printed parts. Keep your build surface clean, and never touch it with bare hands.
Major 3D Print Failures 09/10
Poor Bridging
Bridging refers to a plastic that must be extruded from two points with no support below. Some larger bridges do have support structures, but short bridges are often typically printed with none. This supports saving tons of fabric and print time.
The plastic extrudes across the gap, then quickly cools to make a solid connection. The printer should be calibrated with the simplest settings for special segments. If you notice sagging, drooping, or gaps between the extruded segments, you’ll get to adjust your settings for the simplest results.
| Causes | Solutions |
|---|---|
| High temperature | Decrease temperature |
| Flow rates | Adjust flow-rates. |
– High Temperature
The high temperatures heat the filaments (making them too liquid) that tend to sag. In turn, it solidifies as there is less time to cool.
– Flow Rates
A very high flow rate does not have enough time to harden. The large masses of filament solidifies slower and have more time to be deformed by gravitation. High flow rates result in over-extrusion. It is a printing defect that not only destroys our bridges but also the rest of the object’s surface. A very low flow rate leads to under-extrusion.
– Decrease Temperature
When printing buildings and overhangs, set the printing temperature as low as possible. Do not reduce the temperature too much, as it may lead to under extrusion. It generally depends on the type of filament you are using. The recommended range of temperatures are :
PLA (180-200 °C), ABS (210-230 °C), PETG (220-230 °C), Nylon (220-240°C), TPU (230-240 °C), PC (265-280 °C).
– Adjust Flow Rate
So the right balance is vital to urge an honest bridging behavior and avoid other extrusion problems. The best approach is to test the values step by step yourself as it is quite different for different 3D printers.
Major 3D Print Failures 10/10
Bed Adhesion Failure
It is recommended that your first layer should always connect to the printer’s build platform so that the substructure can be built strongly on this base. Your print may not stick on the build plate at the very first, which can create problems later on.
| Causes | Solutions |
|---|---|
| Incorrect printing speed | Reduce the printing speed for the primary layer |
| Poor Temperature Settings | Modify incorrect temperature and cooling settings |
– Incorrect Printing Speed
The print speed affects the layer adhesions. Faster the speed, lower the bed adhesion. If the printing speeds are high, there occurs some kind of struggle to position the printhead at the right place at the right time. Your material may not settle at the desired location and layer shifting may occur. Thus, failing the print.
– Poor Temperature Settings
Plastics shrink to a cooler temperature. The temperature and cooling settings are to be blamed for this reason. Say, for example, a 100mm wide part is being printed with ABS plastic. It is very likely to happen that the plastic may cool down quickly after leaving the hot nozzle if the extruder was printing it at a 230 degree Celsius temperature.
The ABS part may cool down to a room temperature of 30 degrees Celsius, and the 100mm part would shrink by almost 1.5mm. Because of this, the plastic may fall off and separate from the build platform as it cools. Hence, the temperature and cooling settings are to be condemned.
– Reduce The Printing Speed For The Primary Layer
It is considered best that your first build print layer should adhere properly. Heat your filaments at a consistently high temperature and in a sufficient quantity. Calculate your layer height and store the appropriate setting options for layer height and print speeds in the slicer.
– Modify Incorrect Temperature And Cooling Settings
Inaccurate temperature settings lead to poor adhesion of the print object to the build plate without any other sources of error. Temperature ranging from 200-250 (for ABS ), 220-245 (for PETG), and 180-230 (for PLA ) are some of the good recommendations. It improves the adhesion conditions on the build plate.
FAQ on Major 3D Printing Failures
Bed adhesion problem mainly occurs due to overheating of the print bed. On should do bedplate temperature adjustment before printing by testing it for a range of values on a test print.
The 3 most common 3D print failures are under/over-extrusion, oozing, and calibration error.
Calibration error is the most common reason for 3D print failures and it is very easy to fix them. You can use our calibration cube for adjusting your 3D printer’s dimensions.
Conclusion
We hope that the above guide was helpful to you and may save you from the catastrophes of 3D printing. If you have any doubt please use the comment box, and also share this with your friends to save them from headaches.
Do not forget to mention your experiences in the comment section below.