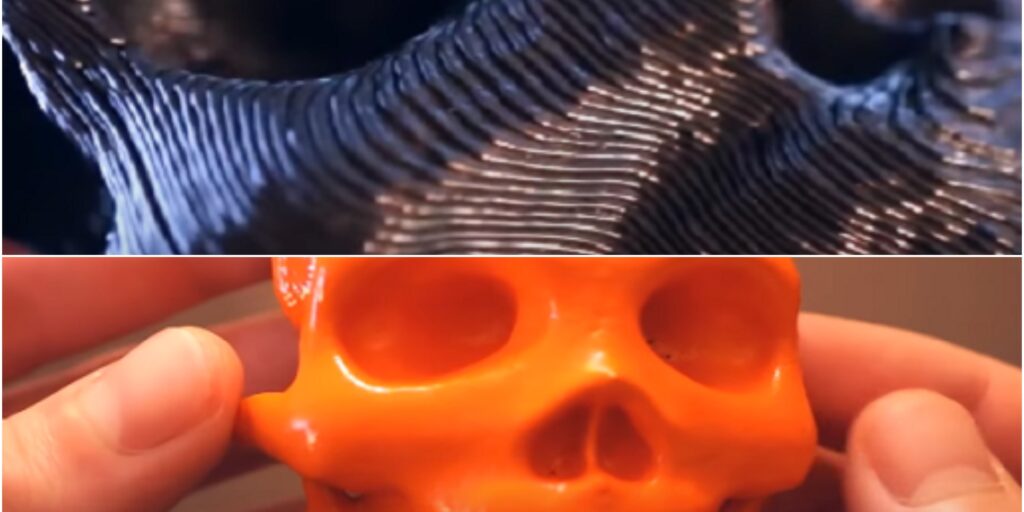
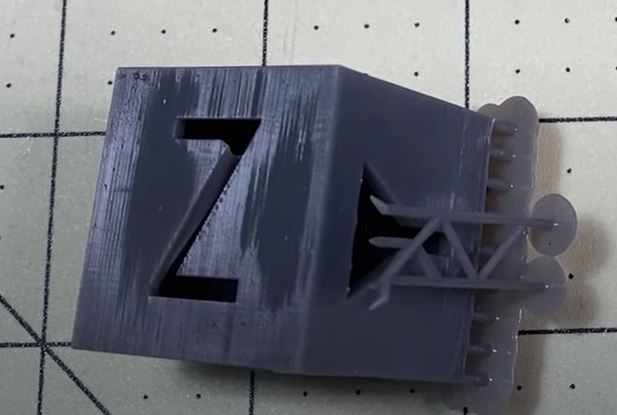
SLA 3D printers are perfect for printing miniature and smooth surfaces. Although sometimes while printing something like a cube or a model having flat surfaces at different angles, one of the surfaces may be smooth, others are generally roughly graded. You can feel and see the pattern (grading) also when you will run your finger along the surface you will hear a scratching noise. This is due to the irregular layer difference, we will explain why this happens and how to correct it in this post.
We came around this problem approximately six months ago while printing the calibration cube through our SLA 3D printer. Although its vertical sides were smooth, the horizontal ones at some angles were not smooth and have that graded pattern over them. We researched a lot about this and finally, after a lot of searches, testing, trial and error we came to a conclusion and thought to share it with you as it can help you to print flat smooth Surfaces on an SLA 3D printer.
You may also have searched about it on the Internet and found some irregular answers like print the surface at 15 degrees, printed at 55 degrees to the horizontal, etc. But let us tell you that all these answers are not applicable for all types of SLA 3D printers for printing flat surfaces. Every printer has its own specification and printing details, thus these singular values do not apply to all of them.
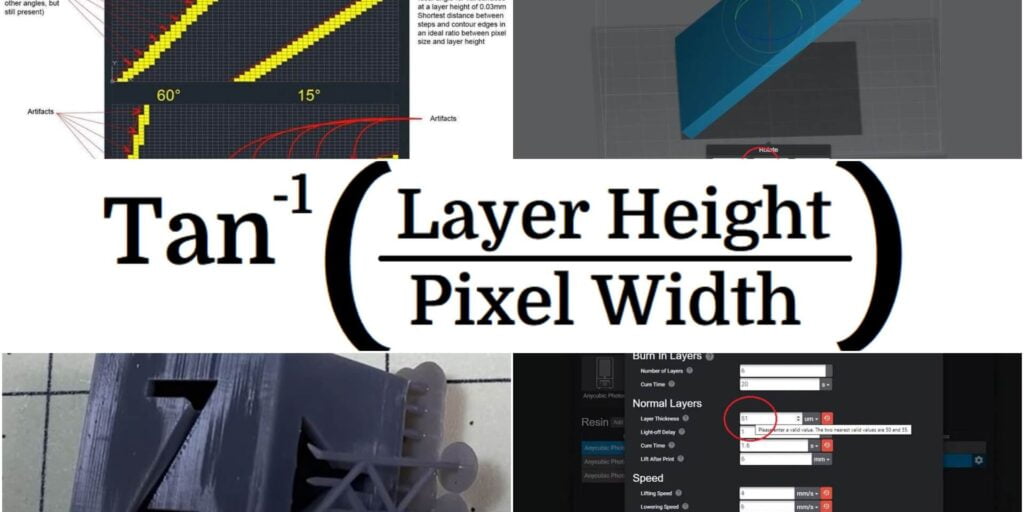
To print flat surfaces on an SLA 3D printer you have to print them at an angle which is calculated by the following formula – Tan-1(layer height/ pixel width).
The above-given equation is very simple to use still, we will discuss it in the post in great detail and we will also try to explain why this layer gradient occurs when you print your flat surfaces at the wrong angle.
Flat Surface Formula
The formula given below is very simple and used to find out the angle at which the surface should be kept with a horizontal bed for a perfectly flat surface without grading problems.
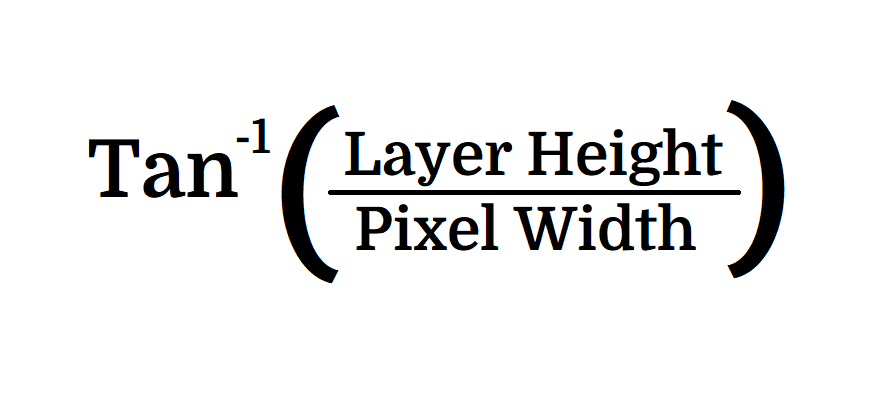
Here Layer Height is the layer thickness you want to print, and this is in your control and can be changed in the slicer settings.
Pixel Width is the XY resolution of your SLA 3D printer, it is predefined and mostly different for every SLA 3D printer. This is the reason why a single value is not applicable for printing flat surfaces on SLA printers. You can find this value on your printer’s description page.
Angle From Horizontal For Flat Surface
We have made a table for you of perfect angle for printing flat surface, this table is for the Top 10 SLA 3D printers in the market. You can comment printer’s name if it is not here, we will calculate your perfect angle for you.
The angle is calculated for 0.05mm layer height it is the most common height everyone uses.
| SLA Printer | Angle from horizontal | Pixel Width (XY Resolution) |
|---|---|---|
| Longer3D Orange 30 | 46.771o | 0.047 mm |
| AnyCubic Photon Mono X | 45.00o | 0.050 mm |
| UNIZ IBEE | 45.114o | 0.0498 mm |
| Creality LD-006 | 45.00o | 0.050 mm |
| Prusa Prusa SL1 | 46.771o | 0.047 mm |
| XYZprinting The Nobel 1.0 A | 21.037o | 0.130 mm |
| Zortrax Inkspire | 45.00o | 0.050 mm |
| Peopoly Phenom | 34.777o | 0.072 mm |
| Formlabs Form 3 | 63.434o | 0.025 mm |
| SprintRay MoonRay S100 | 26.565o | 0.100 mm |
Keep in mind that these angles are for only printing a single flat surface (as shown in the figure below). If you want to print a model with flat surfaces at a different-different angle like a cube then you have to follow the approach in the next section.
Approach For Model With Many Flat Surfaces (e.g. Cube)
Our formula works perfectly for a single flat surface however large it may be. But, when you print something with many flat surfaces at different angles and orientations then this formula is half applicable.
The thing is that the surface for which you have set the angle obtained by the formula and other surfaces parallel to that one will be perfect but other surfaces will have a different angle automatically and thus they will not be at the perfect angle. Thus this will result in grading problems again. To counter this you could follow a simple thing that is given below.
To get even surfaces closest to perfect you have to match layer height to the pixel width (XY Resolution). Although the exact numbers can’t be matched as pixel width is very absurd and you don’t want your layer heights to be that complex.
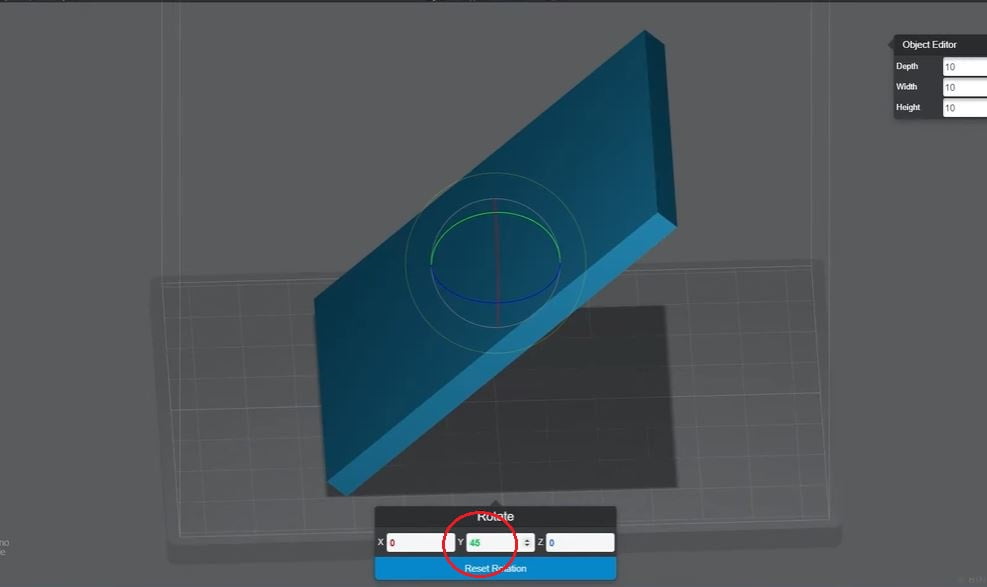
So, you have to keep the layer height close to the pixel width and through the formula, you will get an angle. Now, this is the angle on which you will have a complex figure like a cube with good surfaces.
For example, for SLA 3D printers with pixel width 0.050 mm layer height is to be kept 0.050mm, thus by putting it in formula i.e. Arctan(Layer Height/Pixel Width) you will get 45o as your answer. Now, just tilt your model’s y-axis by 45o (See Image) and you will have a print that is closest to perfect.

Reason Behind Grading/Stepping Problem
During the research phase, we stumbled upon some images whose source is not known (If anyone knows about the source please comment we will link them) but they are perfect for explaining the problem.
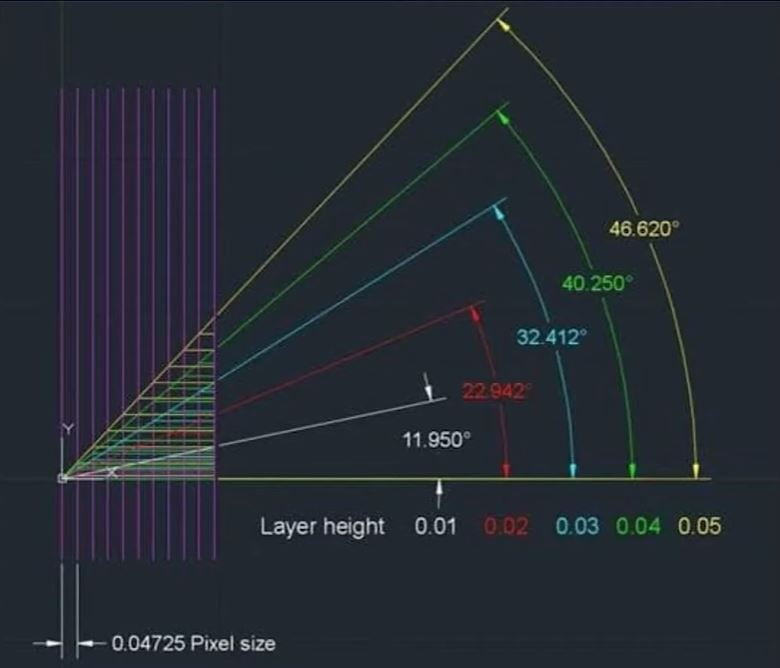
The above image is very popular in communities regarding printing flat surfaces through SLA 3D printers. So, many peoples see that for 0.05 mm layers height it’s showing 46.620o and they blindly follow it.
But, the thing is this chart is true for SLA printers with pixel width (XY Resolution) having 0.04725 mm which is not generally the same for most SLA printers.
So you need to keep in mind the pixel width always before following anything you see.
Now, the reason for the grading is shown in the picture below.
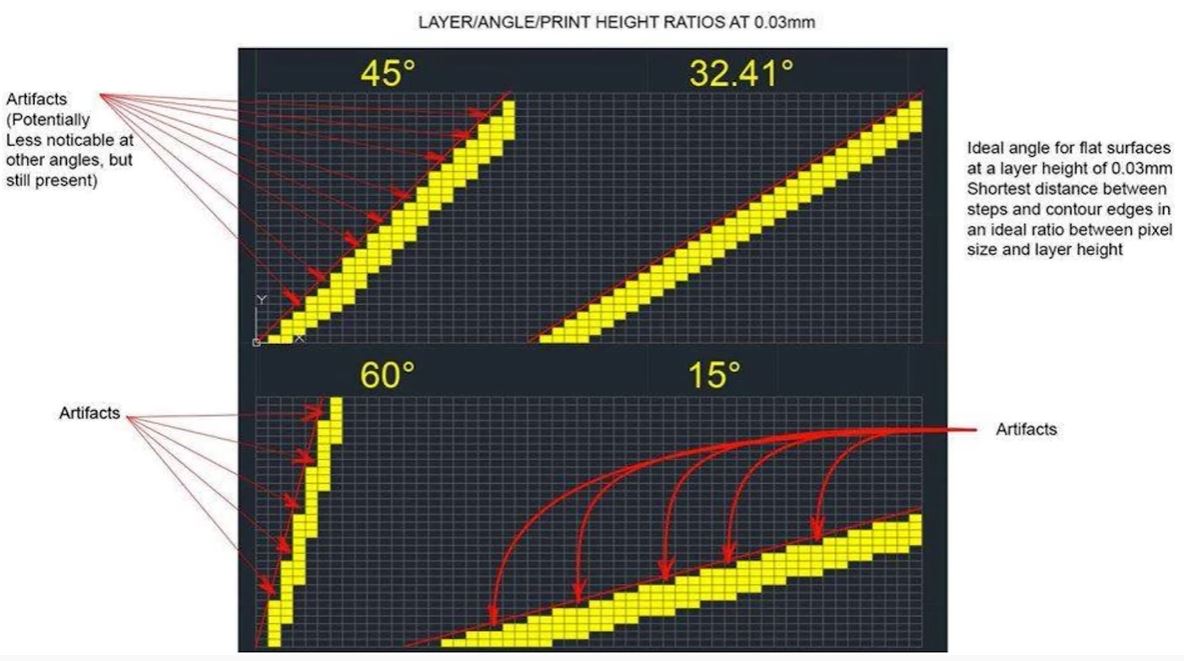
The above-given image is for layer height of 0.03mm and pixel width of 0.04725 mm. Thus, by putting these values in our formula we get 32.41o. You can see that for 32.41 degrees the change in steps is of one-one and thus this gives a relatively smooth finish.
You can also notice that 45o steps are 1-2-1-2 and son on this will not be as bad as 60o and 15o but still, it is not as good as 32.41o for this SLA printer.
FAQ related to Flat Surface Printing
There is no fixed angle for printing flat surfaces perfectly. Instead of a single angle, we devised a formula i.e. arctan(layer height/pixel width). Just put the layer height and the pixel width of your SLA printer and you will have your smooth flat surface.
To print flat surfaces on an SLA printer at different angles in a single model you will have to match your layer height to the pixel width of your SLA 3D printer. Doing this will get you to the most feasible finish with good results.
Conclusion
Printing flat surfaces on an SLA 3D printer is not a big task, you just have to know what you are doing. With the formula, we have given you, now you can print a perfectly flat surface for any printer. Just keep n mind that while printing something like a cube with multiple flat surfaces try to match your layer height with the pixel width of the SLA printer.
If you don’t know your printer’s pixel width comment in the comment box below we will find it for you. Share it with your friends to help them. Thank You.