
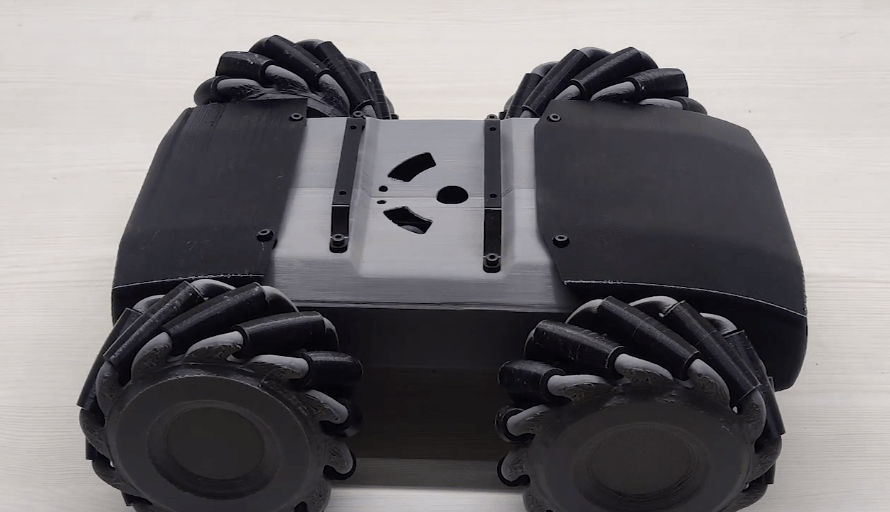
You have mecanum wheels and want to build something with them. Do you want an Arduino-based car that is wireless? If so then you are at the right place. In this blog, we will tell you how to build your own Wi-Fi mecanum car in very simple steps. Everything that you will need is provided in this blog. So don’t hold back and dive right into it.
Mecanum wheel robot car or any other vehicle that has a mecanum wheel is drivable in any direction known as Omni-directional drive. This robot has a 4-wheel drive which means you can control each wheel’s direction and RPM independently so you can move your vehicle in any direction without a change of direction of its face.
In this blog, we make a mecanum wheel robot car with nodeMCU and L298 motor drivers.
The Mecanum wheel is an omnidirectional wheel that allows the vehicle to move in any direction without changing its face direction. Mecanum wheels are also known as the Swedish wheel and llon wheel. But it is necessary for the vehicle to have a 4-wheel drive system without 4-wheel drive your mecanum wheel works like a regular wheel.
As we see each wheel consists of multiple rollers which are at 45o of the rotation axis, due to this geometry these rollers exert force in diagonal when the wheel rotates. For movement in any direction, we have to rotate each wheel in an independent direction or rotate in groups.
Required Material for Mecanum Wheel Robot Car
| Item | Quantity | Purchase/Download Link |
|---|---|---|
| NodeMCU | 1 | NodeMCU (Amazon.in) NodeMCU (Amazon.com) |
| L298 motor driver | 2 | L298 Motor Driver (Amazon.in) L298 Motor Driver (Amazon.com) |
| 12 Volt Battery | 1 | Li-Ion Cell (Amazon.in) Li-Ion Cell (Amazon.com) |
| Battery Holder | 1 | Battery Holder (Amazon.in) Battery Holder (Amazon.com) |
| DC Motor | 4 | DC Motor 300RPM (Amazon.in) DC Motor 300RPM (Amazon.com) |
| Switch | 1 | Boat Rocker Switch (Amazon.in) Boat Rocker Switch (Amazon.com) |
| Mecanum Wheel | 4 | Mecanum Wheel Files (TheMechNinja.com) |
| 3d Printed car body or a custom build. | 1 | Car Body (Contains Wheel, code, and app for Free) |
| Code for Nodemcu | 1 | Code for Arduino Car (Free on TheMechNinja.com) |
| Mobile App | 1 | Arduino Car Mobile App (Free on Themechninja.com) |
Step 1. Download All Required Files
Download all the files i.e. Car Body, and Mecanum Wheels(If you don’t have them) from the links given in the materials required table above. If you don’t have Mecanum wheels then you have to only download the car body file which also has the mecanum wheel, car code, and mobile app for the car all for free, you only have to pay for the body files. We have kept the all prices as low as possible, but you probably know that designing them and running the website costs a bit so we need to charge something.
On the other hand, if you have a car body and mecanum wheels on you then you can download Car code and mobile app for free from the links given above in the table.
Step 2. Printing the Parts
All parts are easily 3D printable on a 220 x 220 x 220 (mm) build volume 3D printer. You can also easily print them on a DIY 3D Printer, if you don’t have one you can check out our very blog on DIY 3D Printer under $150 or Rs. 10,000.
While printing the parts use 20 % infill and 0.2 mm layer height for all parts. For the Mecanum wheel, you can use the same settings. After getting everything printed you can now proceed towards the assembly of the parts.
Step 3. Assembling the Chassis
- First, you need to assemble the Mecanum wheels, you can check the previous blog on printing and assembling mecanum wheels for a guide.
- After that use a nose plier or any other tool to lose the nut of the motor mount and slide the motor in a slot of chassis for the motor now tight the nut.
- Do the same procedure for others motors.
- When you are done using the M3 screw and nut connect both Left and Right parts of the chassis.
- After that, your chassis build is finished but you need to do one more thing to give it a rigid structure.
- Add two supporting bars on the top of the chassis.

Step 4. Connecting All Electronic
For connecting the electronic follow these steps:-
- First connect the female DC jack positive pin to Switch then connect other pin of switch to both driver +12v Input pin.
- Now Connect both ground of motor driver to nodemcu ground and DC jack ground to and motor driver ground.
- Connect any one of motor driver 5v output to nodemcu vin Pin.
- Place a jumper to turn on Motor driver 5v regulator.
- Now connect Left back motor to Left Motore driver pin OUT 1 and OUT 2.
- Left Front motor to Left motor driver pin OUT 3 and OUT 4.
- Right Front motor to Right motor driver pin OUT 1 and OUT 2.
- Right Back motot pin to Right motor pin OUT 3 and OUT 4.
NOTE:- You are not bound to follow the same wiring as we described, you can change them also if the rotation or position motor is wrong.
Or if you make changes in code so you are also free to make changes according to the code in the wiring of the car.

For Left Motor Driver to NodeMCU
- IN1 –>> D1
- IN2 –>> D2
- IN3 –>> SD2
- IN4 –>> SD3
For Right Motor Driver to NodeMCU
- IN1 –>> D7
- IN2 –>> D0
- IN3 –>> D3
- IN4 –>> D4
Optional Electronics
If you do not have a nodeMCU and L298 motor driver, you can use Arduino UNO, L293d motor shield, and HC-05 Bluetooth module. For the new configuration, the new schematic is below.
Bluetooth wiring:-HC-05 pin to Arduino pin
- RX pin of bluetooth connect to arduino TX pin.
- TX pin of bluetooth connect to arduino RX pin.
- VCC of bluetooth connect to 5V of arduino.
- GND connect to ground of arduino.
- STATE connect to pin 2 of arduino.
NOTE:- We use the state pin of the Bluetooth Module to make sense of connecting or disconnect with mobile for Arduino to initialize some particular code when anyone event occurs.
Motor wiring
- L293d shield M1 connect to Left Front Motor.
- L293 motor shield M2 connect to Left Back Motor.
- L293d M3 connect to Right Front Motor.
- Motor shield M4 connect to Right Back Motor.
Step 5. Upload The Code And Test The Connection
- Download Arduino IDE from :- Arduino Official Site
- After installing it open File–>> Prefrences
- In additional boards enter the following link :- http://arduino.esp8266.com/stable/package_esp8266com_index.json
- Click on OK.
- Now Click on Tools–> Board –> Boards Manager
- In search box enter esp8266
- Click on install in esp8266
- click on OK.
- Now close the arduino IDE and reopen it.
- In tool click on board –>> ESP 8266 boards –>> NodeMCU 1.0 (ESP 12E – Module)
First, create the folder with the name of the final same as the code file name. Paste the final.ino in the folder and double-click on it to open it. You need to change the SSID and password of the code. In SSID enter your mobile hotspot name and in password enter your hotspot password.
After then click on the upload button and wait to finish. When uploading is done now open the serial monitor and turns on your mobile hotspot. When nodeMCU connects to your mobile it shows the IP address of the board note the IP address.
Open the app and in the IP address field enter the board IP address then click done. Now check each button to make sure your wiring is correct.
Step 6. Wraping The Assembley
Now, put every wire and other electrical parts in the chassis and make sure there is no loose wire or open wire which could cause the problem. You can also use heat shrink tubes and zip ties to secure the wiring.
The last piece that we 3d printed is a small plastic plate for the switch mount, use a zip tie to attach the switch with the plate slide the plate in its place as in the video (embedded below).
Add front cover of the robot with logo. Before adding the robot’s back cover, connect the battery to the female dc jack and place it in the chassis then screw the back cover of the robot.
For better understanding, you can watch our youtube video of the whole process.
Conclusion
It’s very easy to build your own Wi-Fi Arduino car which is controllable by a mobile app. Still, if you are stuck in some step you can comment it below we will definitely help you as soon as possible.
Share this with your friends and have them built one to race with each other. Thank You.


i has build with l293d + arduino uno r3 + hc-05 and i had a problems is the front wheel faster than the back wheel. It make the robot when move to the side not correctly. Do you have any tips for this problem ?
Check PWM.
Or you can post your code so we find where the problem is.