SLS 3D printing or selective laser sintering is one of the rapidly growing 3D printing industries. SLS printing is a rapid prototyping technique that produces durable 3D models made up of Nylon 12 on Nylon 11 material. If you want a model for Physical use and testing then you should go for SLS 3D printing as the parts produced are durable lightweight and both chemical and heat resistant.
Its name defines its basic principle, the selective laser in its name means that the laser is used to select a part of the raw material and heat it up and sintering is the process of heating raw material in powder form to make a model in whole. We will talk about this in much detail in the post further.
Now, if we want to answer in a few words, what is the working principle of SLS 3D printing? SLS 3D printer’s main technology is based on heating up the raw material (Nylon 12/11) in powder form to make models layer by layer. The process of heating the raw material is repeated for every layer which is approximately 110 microns thick.
An SLS 3D printer consists of two chambers: A Supply chamber and Build chamber, a roller or bed leveler, a galvo meter system fitted with a mirror, and a high-intensity laser beam. We will talk about all these things in detail in the post. and the working of the SLS 3D printer can be divided into three steps: pre-printing process, printing, and post-printing.
Recently we also wrote about the solution of a most irritating problem on how to print flat surfaces on an SLA 3D Printer? and Is FDM Printing safe? You can read about them if you like.
Working Steps In An SLS 3D Printer
The working process of an SLS 3D Printer can be easily divided into 3 parts i.e. Pre-Printing this is mainly the conversion of your design file into data for printer’s understanding, Printing is the actual process where your data is converted into a 3D model, and Post-Printing, this contains cleaning and other things which you need to do for finalizing of your 3D model.
Step 1. Pre-Printing
This is the initial step in your SLS 3D printing and it is one of the most important ones. The data given here will be read by your 3D printer and the instructions are performed accordingly to your data.
The process begins by splitting your cad data into layers. Here each layer contains data for the production of a very thin physical layer of approximately 110 microns through the SLS 3D printer. There are thousands of similar layers which are needed to print your whole 3D model.
The best thing is that in SLS 3D printing supports are not required so you can arrange the maximum number of your designs in the print volume in any way and print them all at once. This saves a lot of time and raw material from being wasted.
Step 2. Printing – Working Of An SLS Printer
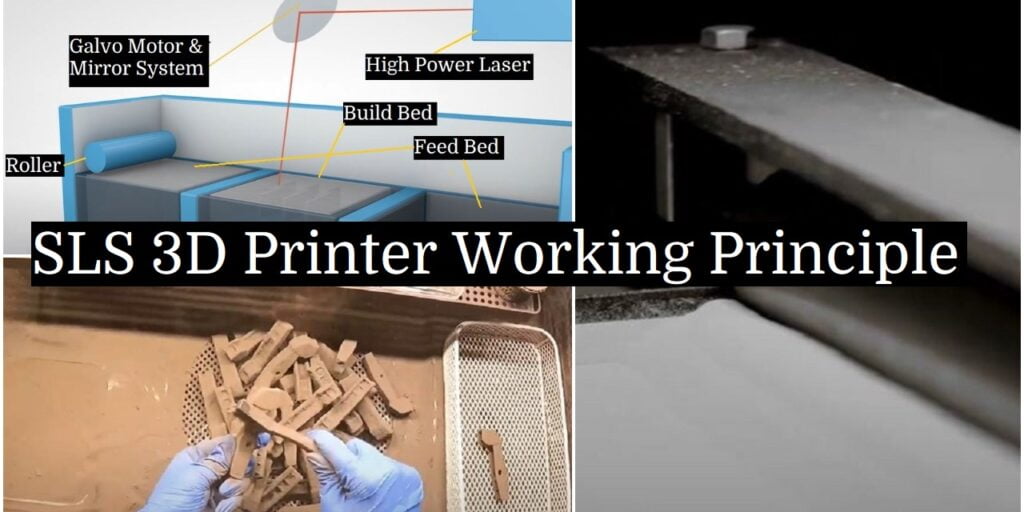
There are many parts that are used to print a single layer in an SLS 3D printer. The most important ones are Feed Bed, Build Bed, Leveling Roller, Galvo Motor system, high power laser, and the raw material. Except for the feed bed, build a bed, and roller all of the other things are inbuilt so we can’t see them without opening our SLS 3D printer.
Leveling roller spreads the raw material (Nylon 12 Powder) evenly from the feed bed over the build bed. This layer is approximately 110Microns thick (layer thickness is also dependent upon your SLS printer’s company). Then the High power laser is used to carve out one layer of the model on the spread powder.
The exact carving path of the laser is defined with the help of the Galvo motor system on which a reflecting mirror is fitted. The laser beam is reflected and moved in a predefined path with the help of this galvo motor mirror system. (See image below)

There are pistons in each bed that help’s the bed to move upward or downward. The feed bed moves a little bit upward for each layer with the help of the piston, and then the roller is used to spread the powder. After that laser is used for heating the selected layer pattern on the spread powder. This heating up makes the Nylon particles bond with the lower layer and thus form a solid model layer by layer. After completion of each layer, the build bed moves a little bit downwards to make space for another layer of powder.


After performing the above steps layer by layer your model is finished, now it’s time for post-curing processes.
Step 3. Post – Processing of Model
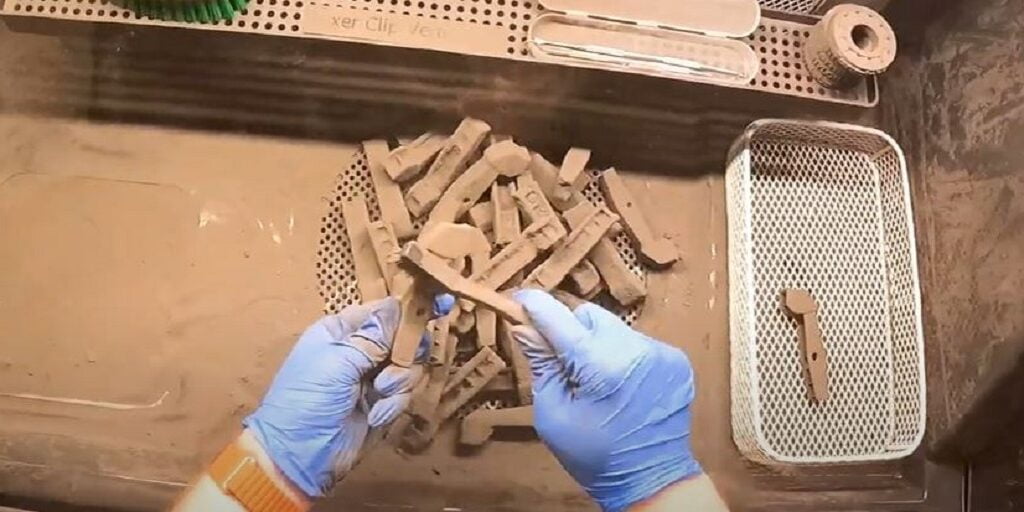
The post-printing process for SLS 3D Printer is quite simple but tidy. After printing, you need to remove the models from the cake of powder which becomes very messy.
You also need to keep that extra powder safe from blowing away or scattering as it can be used for the next print. After removing your models from the cake of powder you need to clean them through air blast or some other way.
Now, after collecting the extra powder some fresh powder is needed to mix and you can store this mix for further prints in the future. Generally, 70% recovered powder and 30% new powder is required for each print. It’s obvious that you can increase the quantity of fresh powder, but you should increase the recovered powder.
FAQ For SLS 3D Printing Working Principle
An SLS 3D Printer has commonly three chambers, two of them are feed beds and one of them is a build bed. The feed bed stores the raw material (Nylon Powder) to be spread on the build bed with the help of the roller.
As the SLS printers don’t require supports for the printing you can print as many models that can fit in the print area at once.
Conclusion
We hope that this post on “SLS 3D Printing | Working and Technology Explained” has cleared your basics on an SLS 3d Printer working principle. If you have any doubt or questions please ask in the comment box.
Share this with others to spread the knowledge. Thank You.