As the name tells End-Stop tell the CNC’s computer that the machine arrives at the end of the hardware limits. In this post, we will talk about 3d printer end-stop types and their uses. These are essential parts of a 3D printer or a CNC machine. Learning about them will definitely help you in diagnosing any faults in them and it will also help you to choose the most suitable type for your machine.
What are the types of Endstops? Endstop is of three types i.e. Mechanical, Optical, and hall-effect. All of them have the same work i.e. to stop but their mechanism and working principle are very different from each other. Their work and principles are talked about in detail in this post. We also talked about how they are used in short.
3D printer End-stops Basics & Types
In a CNC machine or 3D printer, each axis has a separate end stop for each one. Usually, people use only three end stop at the minimum position of each axis which works fine but if you want to make it more reliable that your printhead and heatbed did not crash so you can use End-Stop on all axes max position.
Whenever printhead or heat bed triggers the 3d printer end-stops it sends the single towards the main controller which determines the end of the axis so for triggering the single we can use multiple methods which send the single towards the main controller board.
In the current market, you can find mainly three types of end-stops
- Mechanical End-Stop
- Optical End-Stops
- Hall-Effect End-Stops
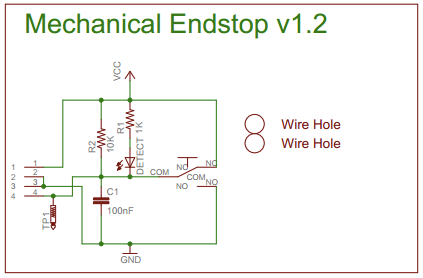
Mechanical End-Stops
Mechanical end-stop is one of the most common 3d printer end-stop types. In Mechanical end-stops single trigger by a switch. When the axis pushes the switch it completes the circuit which sends a signal to the mainboard.
Mechanical End-stops work pretty simply and are durable in different environments and they are not easily fluctuated by any other object.
But, in precision mechanical Endstops are not too good because they are made up of spring that pushes when the switch is triggered but with time and uses the spring became less bounce and the internal cavity becomes rough so the switch parts are not sliding well and sometimes it did not trigger or stuck after triggered.
How to use mechanical end stops
For installing a mechanical end stop on your 3d printer follow the below steps
- First screw the End-Stop on the min of axis.
- Now plug the End-Stop connector in the main board.
- Turn on the power supply of the 3d printer.
- Use any cnc controller software (e.g. Pronterface, Repetier Host, Cura, etc.) to calibrate the position of the endstops
- On which axis you are intalling endstop you need to send command of homing for that axis when printhead arrive at the desire position and endstop did not triggred then triggred it using any non conduucting material. when printhead stop moving then slide the endstop to correct the positon of the endstop. But if endstops triggred by printhead before arriving at the minimum of the axis then slide the endstop towards minimun of the axis.
- Do the same of each axis then crosscheck every thing.
Note:- Here we use a non-conductive material stick for triggering the end stop manually because some power supply may give shock even at 5v.
Pros & Cons of Mechanical End-Stops
| Pros | Cons |
|---|---|
| Mechanical End Stops are cheap and Easy to Use. | Less accurate. |
| Provide good sense for machines. | Misplaced from their position because printhead pushes the switch over time. |
| Durable and sturdy. |
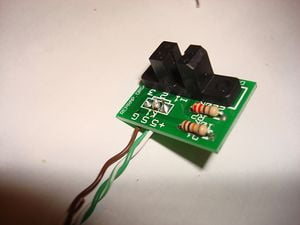
Optical End-Stops
In Optical end-stops triggering switch is replaced with two LEDs, one is Infrared emitter led and the other is infrared receiver led. When infrared light is present on the infrared receiver till the circuit is open and no signal but when any object arrives between the IR receiver and transmitter the IR receiver closes the circuit and the current flow starts so a signal sends to the mainboard.
How to use Optical End-Stops
For optical end-stops mounting is the same as any other end-stops is mount .you have to mount the end-stops at the min of the axis and then you have to add a thin but rigid and solid piece of the strip on the print head. For installing optical end-stop on printer follow the below steps:-
- Mount the end stop on the axis.
- Now press current axis home button and when the axis arive at end of axis trigger the endstop manually by put any piece of plastic or wood or any other material except transparent object between IR leds.
- Now see which part of the printhead are in straigth line with gap between optical endstop.
- After identified the correct place add the strip on that place which also cross the gap between IR receiver and transmitter.
- Do same for all other axes.
Pros & Cons of Optical End-Stops
| Pros | Cons |
|---|---|
| Precise homing. | Can not use optical end-stop in CNC because cutting material can stick in the middle of the sensor and causes malfunctions of the machine. |
| Reliable. | Solving error-related optical end-stops is complex because you do not know which led cause the problem. |
| Touchless or Contactless – This means the print head does not make any contact with the sensor so the sensor does not misplace due to the force of the printhead. |
Hall- Effect Endstop
Hall-effect sensor triggered when it senses any magnetic field around its sensor. This end-stop is the most precise 3d printer end-stop type.
Hall-effect end-stop as two-part. The first part is the sensor itself, which is a screw at the min position of the axes The second part is the magnet placed on the corresponding printhead. When the print head arrives at the end of the axis with a magnet on that side it triggered the hall effect sensor to send the signal to the mainboard.
If the sensor did not trigger at the right time or triggered before the correct place, you had to adjust the sensor by sliding it toward the magnet or away from the magnet.
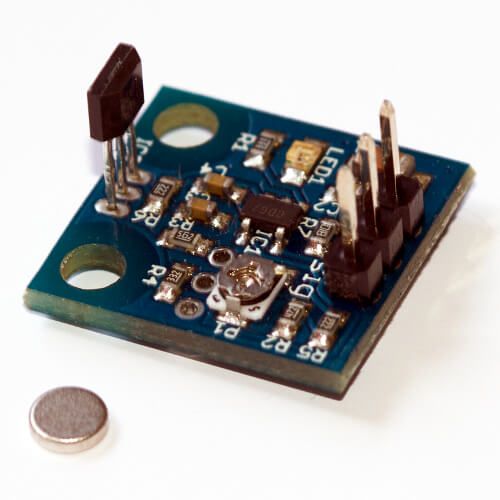
(Source: reprap.org)
Pros and Cons of Hall Effect End-Stops
| Pros | Cons |
|---|---|
| Very precise. | Very fragile if the printhead crashed into the hall-effect end-stop it cause damage to the sensor. |
| Contactless. | Can not use where magnetic interference exists. |
| Reliable working until there are no magnetic interferences. | Hard to figure out where is the problem is it causes malfunction. |
| Complex Installation. |
How to use Hall-Effect endstops
While using the hall effect end-stop be careful you have to keep the strong magnetic field devices away from the printer because they cause malfunctions of the sensor. Follow the below steps to use hall-effect end stops
- Mount the sensor on the min of the axis make sure that that the sensor part of the endstop always toward the printhead.
- Now slide the printhead toward the min of the axis.
- When prinhead arrive near the sensor mark the location on the printhead which is straight in line with the sensor.
- Now slide the printhead away from the endstop and place a magnet on the marked place.
- Now turn on the power supply and press home button of the axes and see printhead stop at the corrct position while arriving to min of the axis.
- If printhead did not stop on correct position then slide the sensor toward magnet or away from magnet for achieve correct position of the sensor.
FAQ on End-Stops
Mechanical end-stops are the most common type of end-stops as they are cheap and pretty durable. They also work perfectly for a long time if everything remains normal.
Hall-effect end-stop is the most sensitive type of end-stop. It stops as soon as its sensor picks up any magnetic field around it.
Conclusion
In the end, you know which types of end-stop and about their working. If you want to know which end-stop is perfect so you need to analyze the project for which you are using it. Every different type of end-stop use in different-different conditions so any one of them is not suitable for all jobs but each one is suitable for some jobs.
Nowadays stepper motor comes with sensorless homing in which you did not require end-stops to tell the machine hardware limits but this feature you only use when you directly drive the load from the motor shaft in any case you use gear reduction with this your sensorless homing did not work correctly.
Some stepper motors also come with a rotary encoder which gives the feedback of the motor position to the computer for precise movement. This is also known as closed-loop control but now we did not see any 3d printer without end-stops in a closed-loop control system but it is possible that you did not require an end-stop when you use the closed-loop stepper driver. `
Note:- For using sensorless homing you have to configure your printer firmware correctly any mistake cause damage to your 3d printer parts.