3d printer enclosure is the next upgrade if you want to make your printer silent, warping-free, and reduce fumes. In FDM 3d printing it is necessary to have a stable temperature on the heat bed but if your printer is open then it is not possible to manage a constant temperature. When we use normal filaments like(PLA, PETG, etc.) an enclosure is not necessary but if we want to print with ABS or some Industrial material then it is necessary to use an enclosure that helps to make temperature stable.
Why is 3D Printer Enclosure recommended in the case of ABS filament? While printing with ABS it is required to set a constant nozzle and environment temperature, thus to keep the surrounding temperature constant an enclosed is required. Without this, the ABS prints are at high risk of getting warped.
In The Post:-
- Need of 3D Printer Enclosure
- DIY 3D Printer Enclosure Items & Tools
- DIY 3D Printer Enclosure Steps
- Advantages of 3D Printer Enclosure
- Precautions While Using Enclosure
- Conclusion
Why we need Enclosure for 3d printer ?
3d printer enclosure not only makes temperature stable inside but also helps us in many other ways which are also causing problems in 3d printing. Some of the important ones are mentioned below.
- Reduce Warping and Shrinking by maintaning stable temperature inside it.
- Noise Dampener
- Store or control Fumes
- Isolation for 3d printer
We will talk about each of them when we have finished our DIY 3D printer enclosed i.e. at the end of the article.
DIY 3d Printer Enclosure Items & Tools
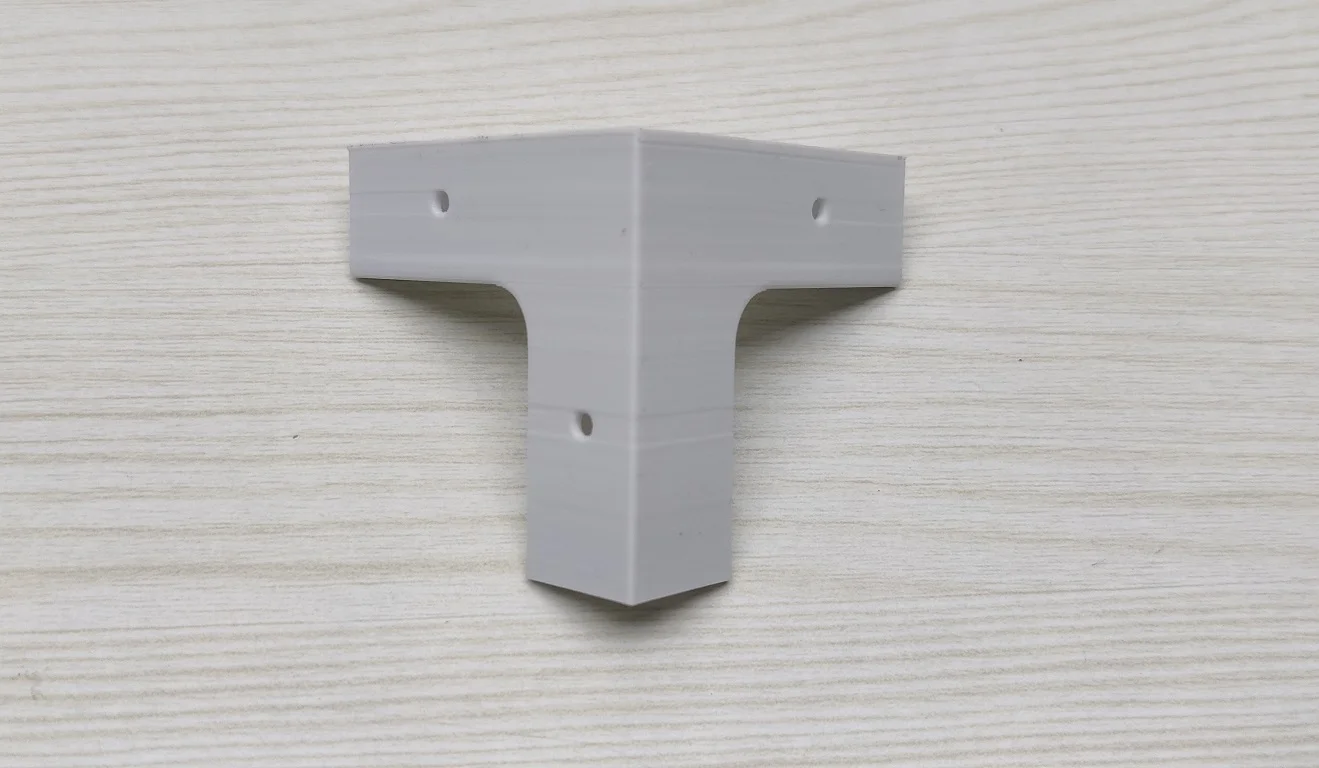
Making a 3d printer Enclosure is not a big and heavy task you can easily make a DIY 3d printer enclosure from local market items. Items are listed below with only 1 part to be 3d printed i.e. corner brackets.
Items Required
| S.No. | Item | Quantity | Remarks |
|---|---|---|---|
| 1. | Triangle shaped wooden stick | 12 (Edges) | Each length depend on your printer size |
| 2. | Corner Connecting Brackets | 8 (Corners) | The download link is given below for FREE |
| 3. | Polythene Sheet | As required | |
| 4. | Screws | As required | |
| 5. | Plastic Zip | As required |
Tools Required
- Drill Machine
- Wood Saw
- 3d printer (For Printing Corner Brakets)
- Hammer
- Heated Rod or Flat tip soldering Iron
DIY 3D Printer Enclosure Steps
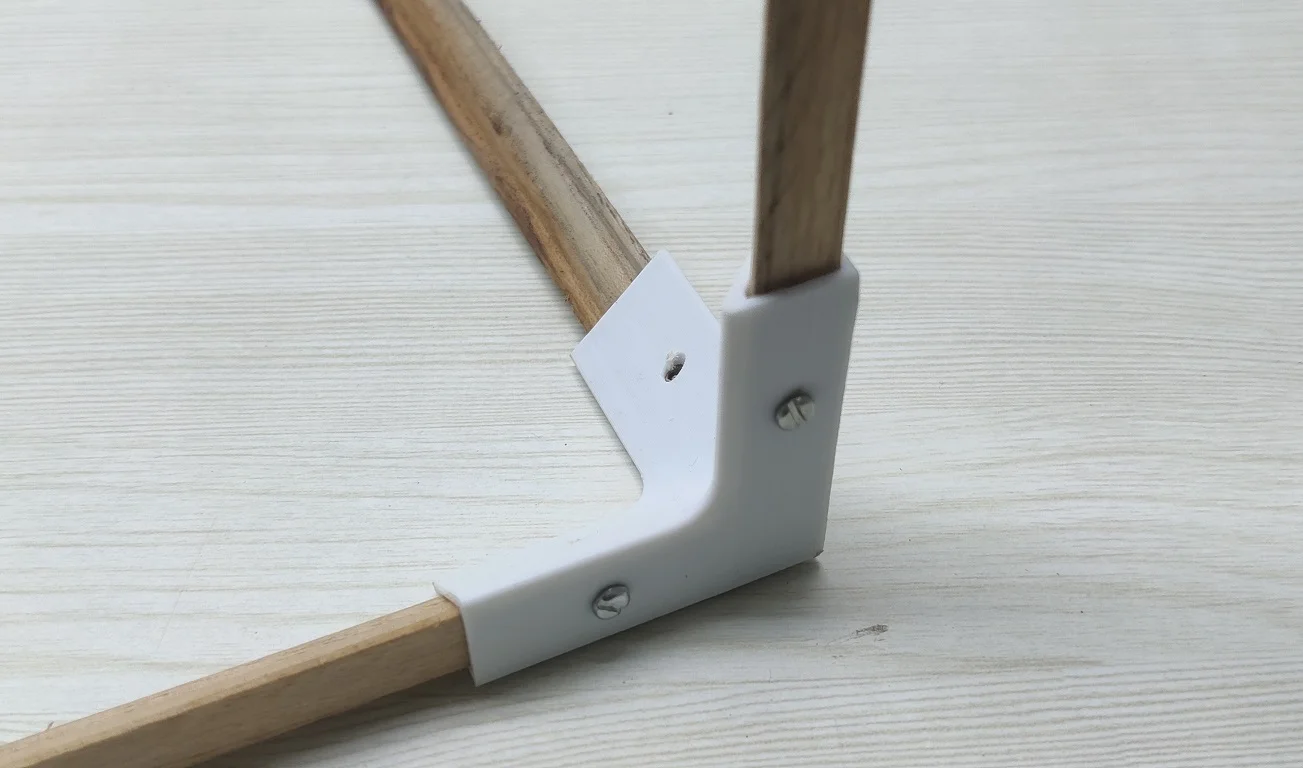
Step1.) 3D Print The Corner Bracket
You can download the corner bracket STL file from the link given below FREE, after downloading print 8 quantities of them. You can use any material to print this, we printed it in PLA.
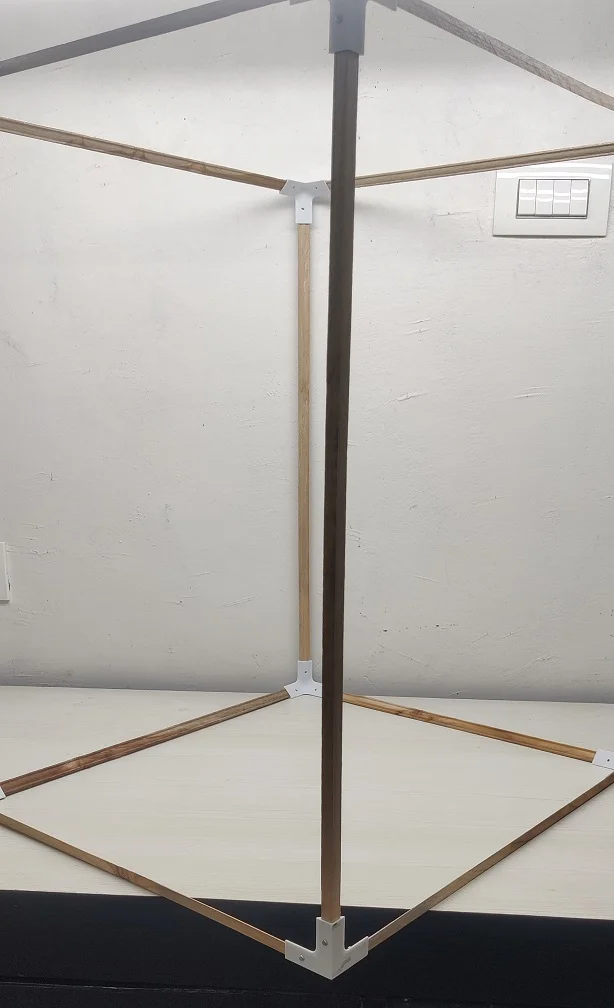
Step 2.) Make Bottom And Upper Structure of The Enclosure
First Measure the length and breadth of your 3d printer. Add some more units in length and breadth for clearance. Cut two Sticks of length and two sticks for width.
Connect All four sticks with the help of the corner brackets and drill holes to tighten them with the screw.
For the Upper structure do the same process and use the same length and breadth which you use for the bottom structure of the enclosure.
Step 3.) Making Middle Part and Complete Structure Assembly of The Enclosure
Now measure the height of the 3d printer, add some more units in measurement for clearance. Cut the 4 wooden sticks in the final length. Now add them to the Bottom structure of the enclosure drill hole and tighten them with the screw. Place the upper structure on the middle part of the structure the same as before, drill the hole, and tighten it with the screw.
Now you can see that structure of the enclosure is complete.
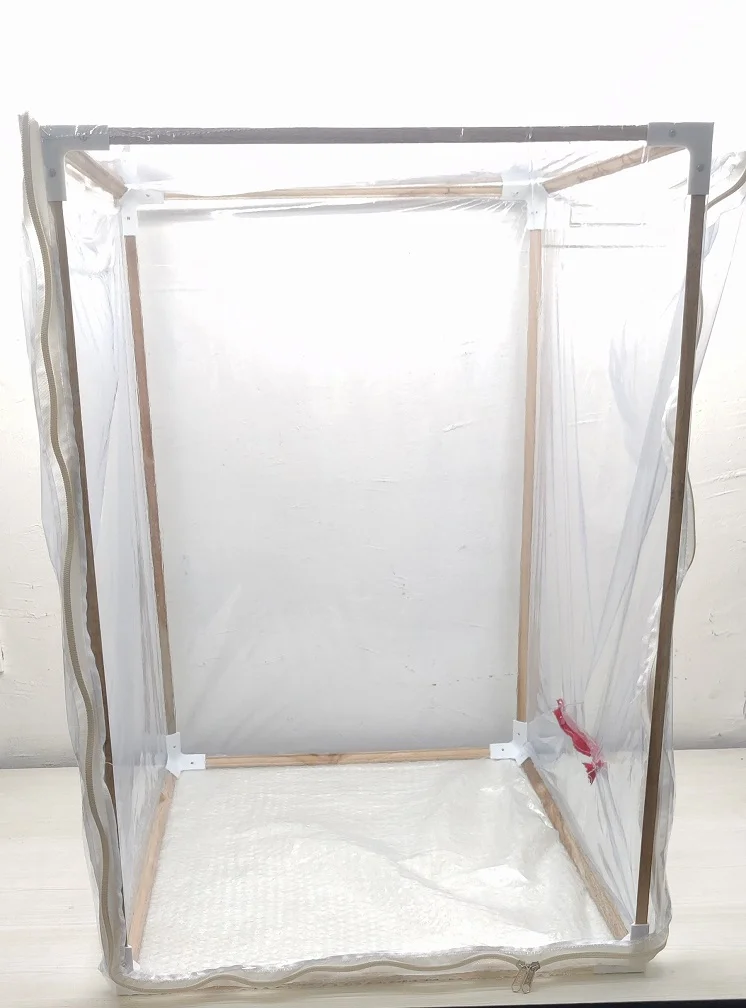
Step 4.) Covering the Enclosure with Plastic Sheet
In this step, we are going to cover the structure with a plastic Sheet. You can use a regular plastic film cover for this. First, you need to cover the bottom and upper parts of the structure. For that cut two square sheets of the bottom area because both areas have the same length and breadth.
After cutting the sheets you need to fix these sheets on the bottom and upper part of the enclosure. For fixing these sheets you can use a small nail or you can use glue. It is better if you use nails with washers which provide the better grip on the plastic film.
Now do the same process for the middle part except one side where you can add an openable sheet with the help of the zip.
Add zip only on the three sides of the sheets left the one larger side of the sheet. For adding zip on the sheet use glue or use the heated rod to connect them by melting both of them a little bit. After adding zip on the sheets. Again use small nails to connect the blank larger side of the sheet to the structure.
After connecting to the structure use small nails to connect the other side of the zip to the structure.
You can add another small zip in a plastic sheet for wires. Your DIY 3d printer Enclosure is complete.
Advantages of 3D Printer Enclosure
Stable Temperatures
The enclosure provides a stable environment inside it when the environment outside is changing. If your 3d printer temperature is not stable then your print model suffers thermal shock due to change in temperature this leads your print model in wrapping in corners and shrinking in surfaces. Also when the temperature fluctuates so your model layers do not mix properly means that your model has un-uniform layer adhesion which causes model malfunction while using.
3d printer enclosure does not generate heat but they capture the heat that produces by the components so you do not need to add a heater form make the internal environment warm. Thus this results in stable temperature inside it which helps in printing with ABS and other materials which have the risk of warping and shrinking.
Noise Dampener
Nowadays 3d printers became very quiet but in the early times of their development 3d printer produce very much noise because of multiple mechanical components and we did not have good motor drivers. But today they became very quiet because of the much efficient Motors and Drivers but, if your printer is in the bedroom and it has to work overnight then you need an enclosure to protect yourself from the noise generated.
Also if you have a printer in the office then it needs an enclosure to reduce the noise level. People use noise absorbing material also in the inner coating of enclosure walls for reducing noise completely.
Fumes control
When you use 3d printer then it releases toxic fumes into the surrounding so it is necessary to use 3d printer in a well-ventilated place. But if not able to find a ventilated area for 3d printer then an enclosure might help you. In an enclosure, you can add a pipe from which fumes are extracted to the outside of the house.
Isolated 3d printer
Enclosures also provide the isolation of the 3d printer. If you have children then you must have it to keep away children from hot and heavy moving parts. The enclosed 3d printer is safer than an open 3d printer but it may become risky when you are using a metal enclosure or inflammable material enclosure.
Most of the 3d printer enclosures have flammable material because it is cheap and easy to make from wood, plastic, and other things. But on the other hand 3d printer have high-temperature objects which may lead to starting the fire, so for safety purposes, people also create metal enclosures. You can also add a fire sensor in the enclosure for better safety.
Precaution While Use 3d Printer Enclosure
- When you use enclosure, internal temperature of the enclosure is certainly high so their is always a risk of electronic part failure or mechanical part failure due to intensive heat of the machine.
- Keeping your electronics outside the enclosure is really good idea.
- Add fire alarm or smoke detector in enclosure for more safety.
- Make sure your enclosure have vent pipe for releasing fumes outside.
- Some times filament start degrading if you put it in hot enviorment for long time very often. So it is advisable to place your filament outside of the enclosure and use guidence pipe for it’s smooth movement.
FAQ
Which type of enclosure is preferred for ABS 3D printing?
You can use simple polythene as an enclosure if your ABS printing is few hours in a week, if you have more hours of printing then you should go for prebuilt enclosure 3D printers.
How much does it cost to build a DIY 3D printer enclosure?
It may cost anything between 20 to 30 USD depending upon the local rates of the parts we have used, but it will never cross the 5 dollars mark in any way.
Conclusion
3d printer enclosure is not that much complex as you think, if you want to print only with ABS for only some time then this enclosure is enough. But if you want more features and flexibility then you can add them according to your need. For adding more features to the enclosure it is necessary to use a solid sheet which gives your printer encloser more stability. After that, you can add a pipe in the upper section of the encloser for releasing the fumes generate due to the melting of the material to release outside of the room.
Some people add a display, power supply, and power input point in enclosures body thus they have ease of access for controlling the printer while it was in the encloser. For more safety, you can use metal sheets for creating a fireproof enclosure. Creating encloser from metal sheets will cost you high but it also gives you more safety features which are also important.
If you have any questions then please use the comment box given below. Thank You.